Tuesday, November 12, 2013

Tueday Tutorial with Sandy

b1

Hi it's Sandy with a layout that's a departure from my normally layered scrapping style. There are so many wonderful embellishments in this month's Main and Embellie Kit, I had to make a page featuring them. So I decide on where to place the photo and then designate an area next to it to lay out my embellishments in a block. It's fun technique, like piecing together a jigsaw puzzle, and the embellishments receive extra impact when showcased this way.

i3

Here are some tips on how to arrange your one-layer embellishment block :
  • pick a variety of shapes and sizes to provide an interesting display
  • allow for a clean margin of breathing space around each piece
  • place shapes so their edges form interlocking patterns e.g. arrow head and flag tail 

i6

I like grouping pieces of the same colour close together for greater impact, starting from turquoise on the top, black in the middle and then white at the bottom. Items like the  Star & Bee chipboards are great to use as you can customise them with ink or mist. Here I've also added texture by applying white flock (to the You and Me words) and  black glitter (to the arrow). The only things from my stash are the white arrows from a previous kit and the background cardstock.  

Cut Out1

I also have a tip regarding this Heidi Swapp Mixed Company vellum embellishment. Simply pop out the circles and diamonds and use the negative space die-cut that's left over. Here I cut it into two pieces and placed them to create the illusion of a subtle column of circles running down behind the photo.
 
A2
 
Hope you enjoy scrapping with your November kits and playing with all the embellishments as much as I have. I'll be on vacation until December so this will be my final CTK layout and blog post of 2013. Wishing everyone happy holidays and see you back here in the new year.  
 

Monday, November 11, 2013

Simply Strategies

Hello Janna here to share a simple strategy on making a mini album. I rarely throw packages away, I love using them as backgrounds or covers - as I did with this mini album. I cut a piece of the Citrus Twist kit box, pulled off the top layer and added Gesso. I did not pull off the entire paper, like this the album has a shabby/industrial/grunge look. I glued kraft colored cardstock on the backsite of my cover to make it more robust.

Janna-Werner Janna-Werner-2 Janna-Werner-3 Janna-Werner-4 Janna-Werner-6 Janna-Werner-7 I hope this has inspired you to reuse your box and making something creative!

Sunday, November 10, 2013

Sunday Sketch with our Guest Designer Janna

Here is your new sketch challenge for this week.  Our sketches are designed by Inspiration Girl Kasia.

Guest

And this week we had our guest designer, Janna Werner work with the sketch. She usedthe November Main Kit and Embelli Add-on. Here is what she had to say about here layout.

"I had these photos of our trip to the fair. I took them with my mobile phone and although I edited them, they were still quite dark. Or let´s say darker than the photos I would usually print. On top, the photos were very colorful. I did not want to print them in black/white because the photos live from the colors. Instead of using bold colors that would go along with the intense colors of the photos, I decided to stay with a pastel color scheme. This might be a clash, but it reduces the intensity of the photos and lets the page appear calmer."

Janna-Werner-3
 

Here are some close ups:

Janna-Werner-2 Janna-Werner

Now to play along with this sketch challenge, upload your layouts to the gallery by Saturday, November 16th to get your name in a drawing to win a $5 GC to the store. When uploading to the gallery you can name it as you would normally but please include "Sketch 11/10".

Saturday, November 9, 2013

Hello layout by Amélie

Hi, here is Amélie and today I am going to share with you a new layout made with October Main and Embellie kits.
Pictures on this page have been taken in Vietnam, on Mekong. You can see a floating fishing village.
To reduce the contrast with the paper under my backgroung, I added between some vellum.
This kit is so versatile, perfect for fall but also for finishing to scrap the rest of your vacation pictures.

hello5

Some close-ups:
hello2


hello3


hello4

See you soon,
Amélie

Friday, November 8, 2013

Playing with Pocket Life with Melissa

There's a party going on in the November Pocket Life kit this month- a Polka Dot Party, that is! This month's kit includes the 6x6 pad from Elizabeth Kartchner's latest addition to her Dear Lizzy signature collection with American Crafts, and Citrus Twist has paired up Polka Dot Party with our own exclusive Pocket Life card designs for a fun and unique kit.

project life 2013 week 24.jpg

At first glance Polka Dot Party is filled with pinks and is a bit girly, but I pulled the aquas, blues, and yellows from the collection along with just a couple of hints of that pink to show how you can get a totally different look from your 6x6 pad based solely on the papers you choose to use in your layouts.

DSC_0172.jpg

The feather card is from Carta Bella's Wildflower collection, a brand new mid-season release, and that particular sheet of paper can be found in Citrus Twist's Main kit this month. The Main and Pocket Life kits are always perfect companions!

DSC_0173.jpg

My absolute favorite exclusive card this month is the "You live but once, you might as well be amusing" quote that would be at home on pretty much any week of my album! I used it as the title card for this particular weekly spread and used the Basic Grey alphas from the Pocket Life kit to add the date.

DSC_4867.jpg

The 6x6 pad also includes scaled-down versions of the same cut-apart sheets that are part of the 12x12 papers in Polka Dot Party, and their small size is absolutely perfect for adding little embellishments to the small pockets.

DSC_4868.jpg

DSC_4866.jpg

It's not a Pocket Life Friday around here without sketches, and I've got a shiny new set for you! You can either reference the image below, or you can download a PDF version here.

Pocket Life Sketches 11.8

Happy Friday, everyone! I hope you all have fantastic weekends!

Thursday, November 7, 2013

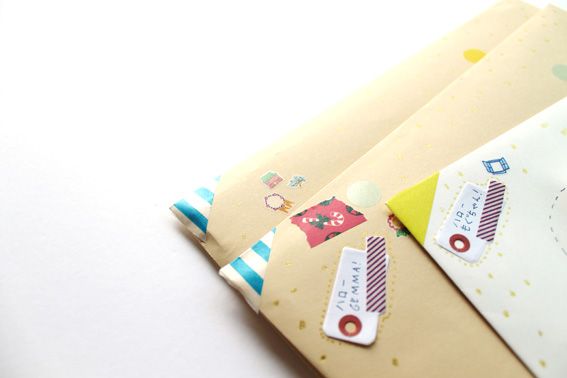
Be Inspired- Happy Mail

Hello!
Do you like getting traditional mail? For me it's always such a special moment when among the bills and ads I find a little envelope with a handwritten letter. Since I moved abroad 5 years ago I try to regularly write letters to my family- yes of course we communicate through skype and e-mails a lot but well... the letter is something different :)
With holiday season coming soon we send more letters than during other months of the year and today I'd like to share with you some inspiration for making the envelopes look pretty and unique! I'm going to try some of these with my Christmas cards this year!


I love how much you can achieve with some pieces of washi tape, few stamps and regular stationery items! I think decorating envelopes this way would be also a great excuse to use some older christmas scrapbooking lines or .. kit lefotvers:) Make your mail even prettier this season and make sure to share with us all your beautiful wraps and envelopes!
Have a creative Thursday!
Kasia


Wednesday, November 6, 2013

6x6 Paper Play with April

Hi everyone!  April here to share a layout I created using paper from the 6x6 paper pad that came in November's Pocket Life kit, some embellishments from the PL embelllishment kit, and a 12x12 sheet that came in the November Patterned Paper Add-On.

It was the sheet from the Patterned Paper Add-On that prompted me to scrap a photo from my wedding.  The sheet is yellow, gray, and white which were my wedding colors.  The timing of it being in November's kit was perfect though because our two year wedding anniversary is coming up next week (we got married on 11.11.11)!

This is the first wedding photo I've scrapped.  (Note to self: Start scrapping more wedding photos!) 

DSCN3838_800_CTK

It was the frame paper from the 6x6 paper pad that inspired this layout. I saw it and knew I wanted to fussy cut it and use each frame individually. I used some floss from my stash to outline each frame to add more texture to this layout.

DSCN3840_800

I also did a fussy cut of this flower paper from the 6x6 pad so that I could slip my photo behind it, then I added additional embellishments for a clustered effect.  The title card is one of the journaling cards that came in the November PL kit.

DSCN3839_800

And like last month, I put those tear strips to use!

DSCN3842_800

Thanks so much for stopping by!