Showing posts with label add on stamp. Show all posts

Saturday, September 23, 2023

3-to- INSPIRE with Marci


Hello Friends! It is Marci with you today. We are going to have fun with our challenge this Saturday. 

Here are the three suggested items to incorporate into your project, 

1. Use a pocket page.

2. Use a stamp set.

3. Document a topic that says a lot about you. 


For my project, I used the ALL ABOUT ME kit to document my routine of making an espresso drink every morning. Drinking coffee is something I am known for with my friends and family. My scrapbook pages about myself would not be complete without including this topic. 


I had fun layering several of the embellishment pieces from the kit on the full-page layout and the pocket cards. Pocket Cards and pocket pages are a great way to incorporate different colors and styles into your layout. Sliding cards into the pockets can take a lot of the guesswork out of designing a spread. 


Including stamping in two different ink colors, adds some visual interest to my embellishment clusters.  The small circle and asterisk on the Storytelling v2 all-about-me stamp set were perfect for this. 

If you like this CAFFEINE card as much as I do, check out this set of everyday moments double-sided journaling cards. It is great to have extra journaling cards in our stash that can mix and match with any kit. 

I had so much fun putting this layout together. I hope you are inspired to give the challenge a try too. 


Sunday, April 3, 2022

Sunday Sketch with Aimee


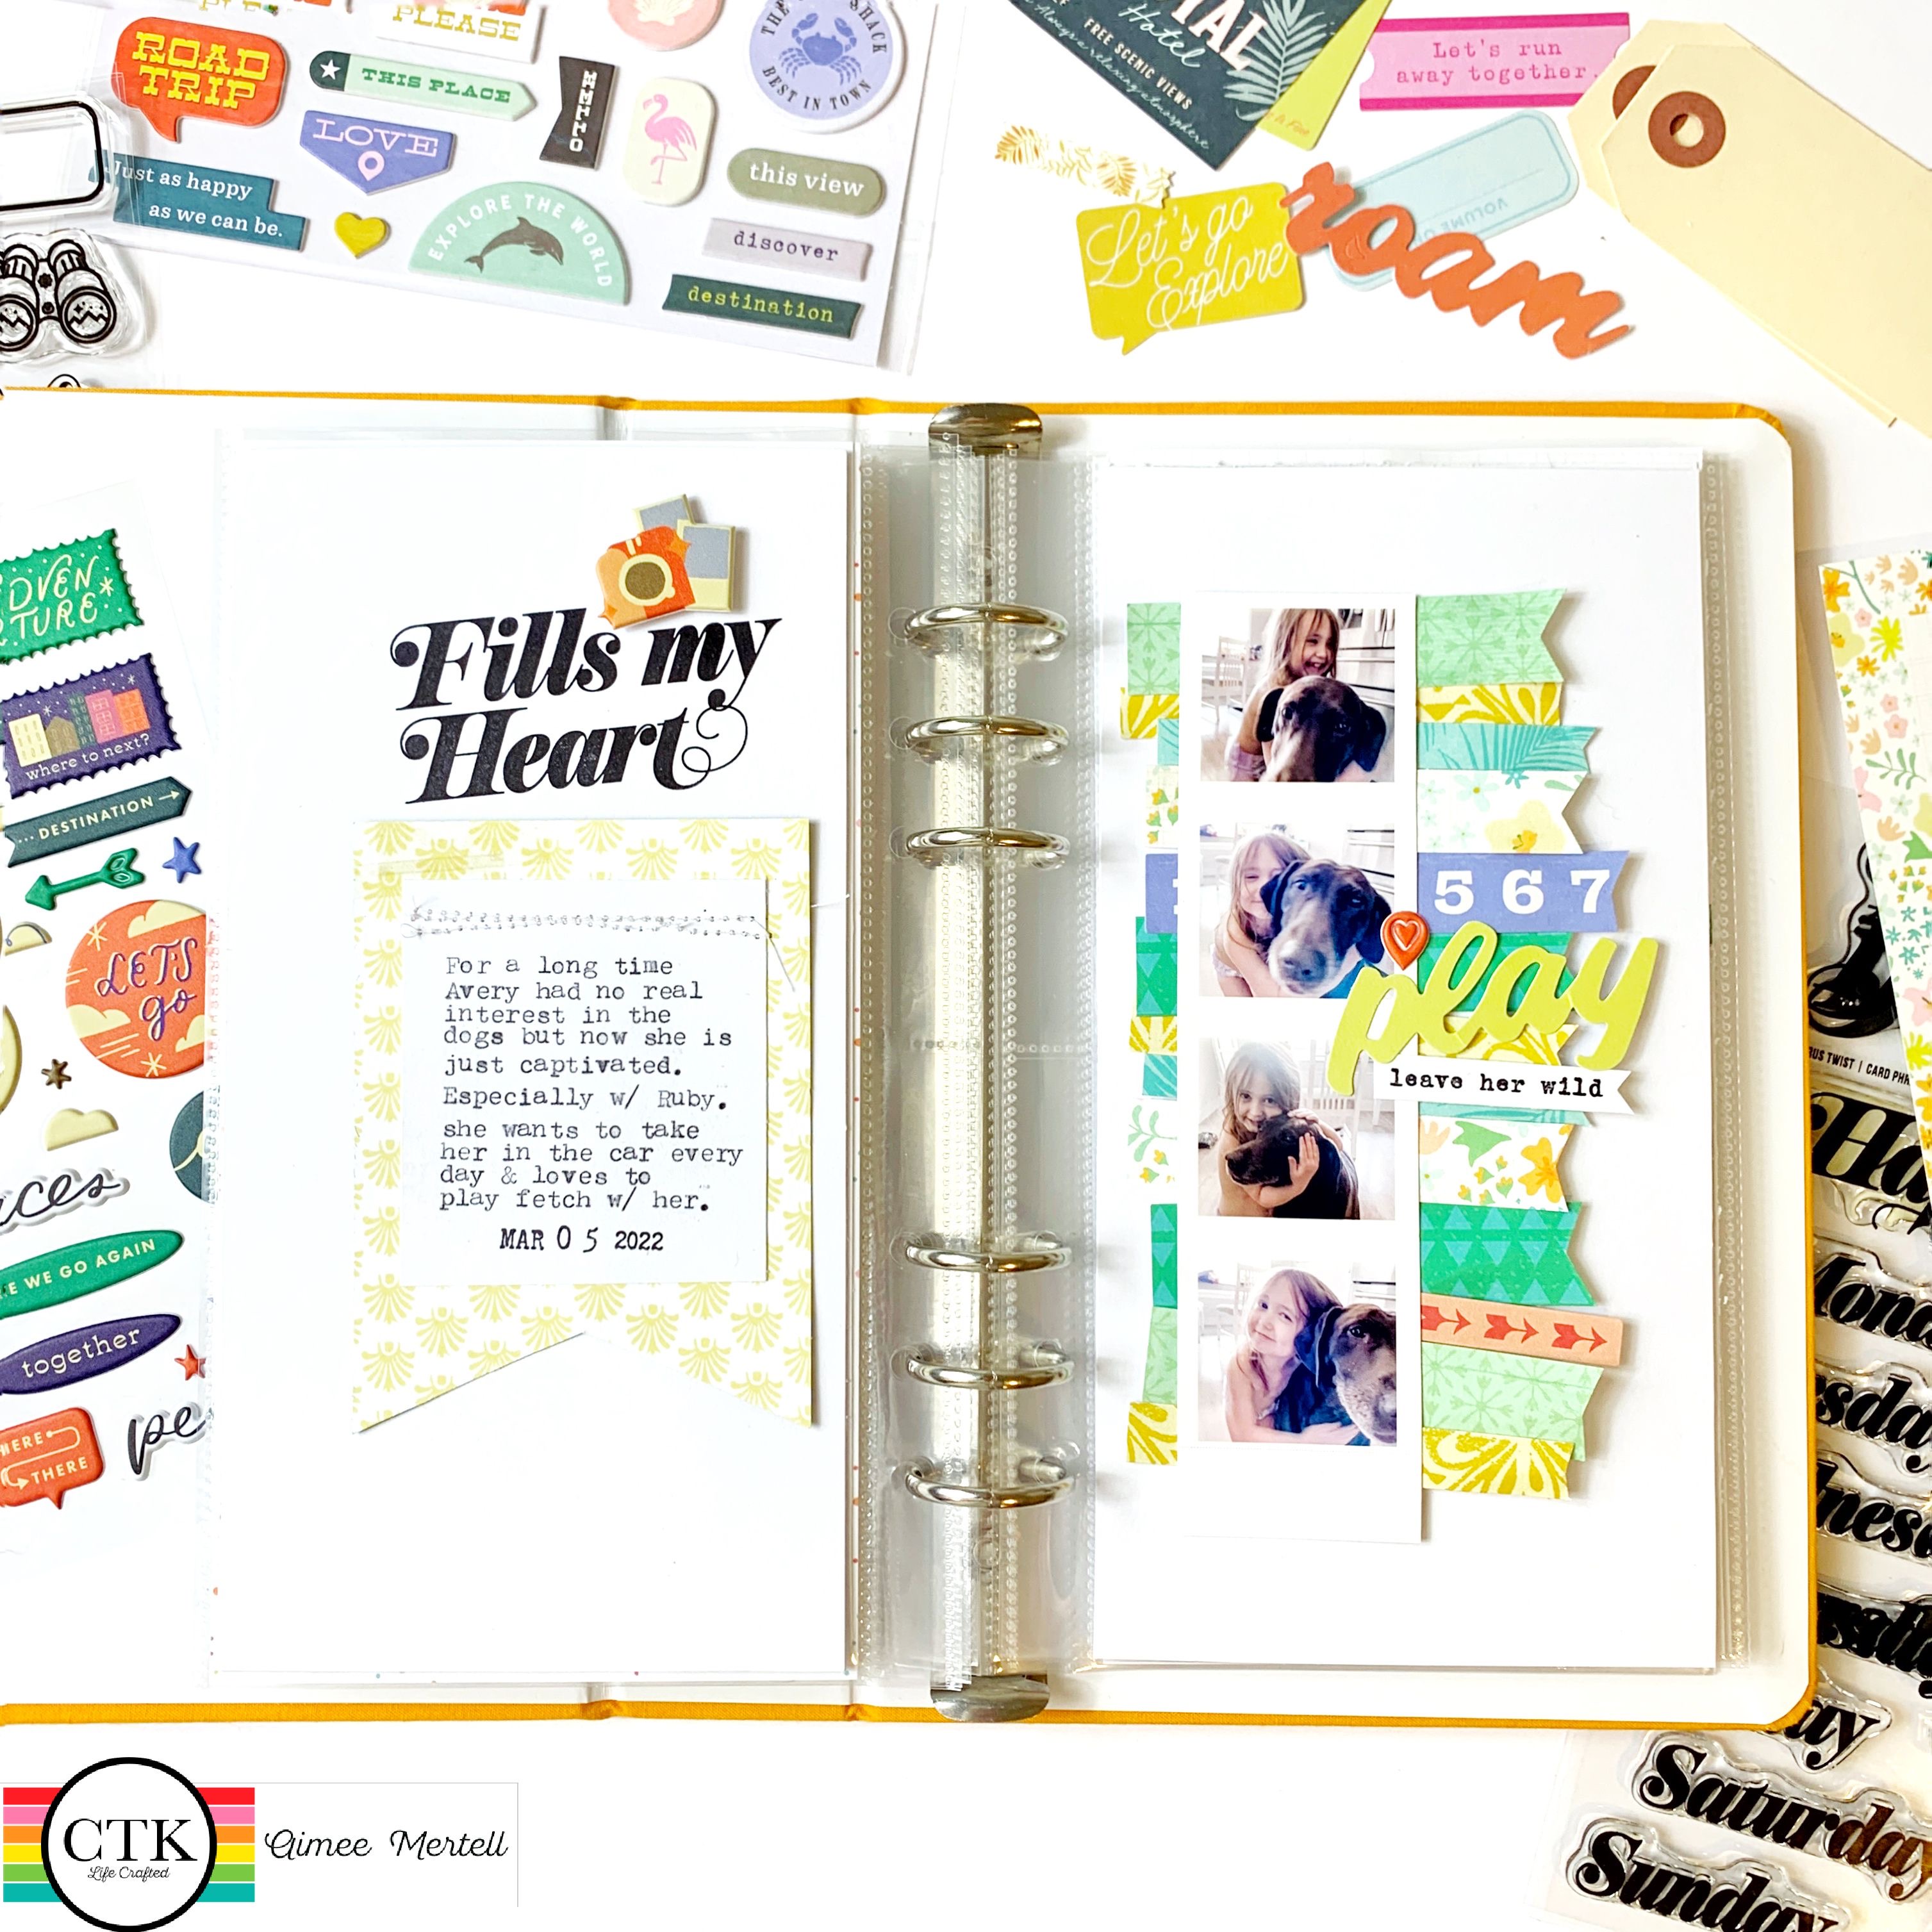
     Hello Citrus Twist friends! It's Aimee here today hosting this week's Sunday Sketch featuring the new Travelogue Kit! First, let's take a look at the sketch we'll be working with: 


Love it! As you can see it's a full page layout sketch but I am going to modify it to fit into my Life Crafted Album. Doing this is relatively easy when you think about the sketch in two parts— the title on one page and the photos and flags on the other like so. 


I love the idea of a photo strip so I snagged these camera roll photos of my daughter and our dog Ruby to do  just that. I selected my favorite patterns from the Travelogue paper stack to make a ton of flags or banners to layer them haphazardly behind my photo strip— really playing along closely with the sketch.


As you can see these photos are not travel related but the Travelogue kit still works beautifully and I love all the bright colors! I grabbed some die cut strips from the Travelogue Die Cut pack to add into my flags as well as this super fun die cut, "play" to layer over the top.


For the, "big title" side of the page I decided to pull a sentiment from the 6 x8 Card Phrases This Day stamp set to use as my title. I think the font is just beautiful and really matched well with the sketch. For my journaling I decided to use a 3x4 card from the Travelougue Kit cut into a banner shape. I think this helped to add a splash of color and balance to this side of the spread and was the perfect addition to my heavy black title. 


I typed up my journaling on white cardstock and machine stitched it right on top of the banner to make it pop. Next, I made my own banner using a sentiment from the 6x8 Travelogue stamp set and added it on top of the photos. Leave her wild! I think this helped to pull some of that black to the right side of the page. 


I finished off by adding some pops of vibrant orangey-red using puffy stickers from the Puffy Sticker sheet and there you have it! This sketch was so much fun and so versatile— you can really make it your own! I hope you've been inspired to give it a try. Catch you next time!


Affectionately, 


Sunday, December 13, 2020

Sunday Sketch with Marsha


Hey friends!  It's Marsha here with this week's Sunday Sketch challenge!  I created a spread in my December Stories Life Crafted album using the Sparkle & Joy kit and digitals from the shop.

Here's a look at the sketch:


Here's my take on the sketch:


I love the design of this sketch, so I chose to follow it fairly closely.  I began the layout by trimming a music patterned paper to fit as a full page in the album.  I chose to flip the design and added my photo to the left side of the spread.  I trimmed a woodgrain patterned paper from the kit so that it spanned both pages and added my photo onto it.  With my Silhouette Cameo, I cut out several snowflakes using the Love - Christmas 2020 cut file.  The cut file was quite delicate, so I offset it slightly, making it a little easier to cut.  I layered some of the snowflakes below the photo, in place of the leaf design on the sketch.  


I also added a snowflake onto the photo and at the top of the right page, carrying the design across the spread.  Using the Sparkle & Joy kit stamp, I stamped a few words and phrases, trimmed them into strips, and added them to a few areas of the spread.  


For the right side of the layout, I created a pocket using one of the journaling cards from the kit.  I layered a circular piece over it (die cut from another journaling card).  I created the title using a puffy word sticker and Candy Apple Puffy Alphabet Stickers.


I typed my journaling onto a Comfort & Joy Digital Journal card, printed it out, and added some ribbon from my stash to the top.  As a final finishing touch, I added a few more puffy stickers from the kit around the spread.


I hope you will join in on the challenge and create a layout based on this week's sketch!  I can't wait to see what you create!

xo,


Wednesday, December 2, 2020

Life Crafted with Marsha


Hey friends! It's Marsha here today, and I'm sharing a Life Crafted album layout using some of the new products available in the shop this month.

Here's a look at the spread:


I was inspired by the awesome new Get Messy stamp to create a layout documenting a recent photo of me crafting in my studio.  This stamp features so many sentiments and icons that are perfect for documenting creativity.  I trimmed two white cardstock pieces to 5"x8.25" to begin the layout.  Using the Crate Paper Marigold 6x8 Paper Pad, I chose a few papers and trimmed them down to approximately 2" square.  I also tore one of the edges of each paper for a bit of added texture.  I stamped the numbers 1, 2, and 3 on each patterned paper using the Big Numbers stamp and black ink.  Next, I layered a floral ephemera piece from the Florals Ephemera behind each number and added messy machine stitching with black thread.  


I added more stamping beside each number using the Get Messy stamp.  I love the fun sentiments in this stamp set!  To complete this page, I added a few more ephemera pieces and some of the Sunshine Puffy Alphabet Stickers.
 

I trimmed a piece of patterned paper for the right side of the spread and adhered it to the white cardstock base.  I layered another patterned paper behind my photo and added them to the layout.  Then, I used some of the Tickets & Tags Ephemera and Florals Ephemera to embellish the spread.  


I did a bit more stamping using the Get Messy stamp and added some machine stitching to finish the layout.

I love how this spread turned out using new items available in the shop!


Thank you so much for stopping by today!  I hope you will share your Life Crafted layouts with us in the Citrus Twist Fan Page on Facebook or on Instagram using #citrustwistkits.

xo,

Saturday, November 21, 2020

3-To-Inspire with Marsha


Hey friends!  It's Marsha here with you today, and I'm hosting this week's 3-to-Inspire challenge.  I created a layout in my Life Crafted Album using this month's Life Crafted Legendary kit and the Scrapbooking Addon kit.  I also used the This Is Life Legends stamp and the Traveler's Notebook stamp-- it wouldn't be one of my layouts without at least a little bit of stamping!

Here are the prompts:

1. Feature one stamp or stamp set

2. Use 5 or more patterned papers

3. Use a variety of embellishments 


For my layout today, I wanted to document a photo of my sweet little niece.  I planned to use a variety of colors and patterns, so I chose to print the photo in black and white.  I began the spread by stamping the frame from the This Is Life Legends stamp using black ink onto several patterned papers from the LC and Addon kits.  I also used the packaging from stickers in the Addon kit and an ephemera die cut from the LC kit.  Next, I trimmed around the stamped images and arranged them vertically on the page.  


I embellished the stamped frames with additional stamping and stickers.  I also added a floral die cut below the frames for a bit of extra interest.


On the left side of the spread, I trimmed a patterned paper from the LC kit and adhered it to the edge of a white cardstock base.  I added my photo and did some simple embellishing using ephemera, chipboard stickers, and puffy stickers.  I also added another one of the stamped frames so that the pages would feel more cohesive.  

I love how the layout turned out using this month's kits and stamps! 


Thank you for stopping by today!  I hope you are inspired to create a layout based on these prompts!  


Tuesday, November 10, 2020

Pocket Page Challenge with Shannon


Hello there, crafty friends! Shannon here with a pocket page to share. I used the November 2020 LEGENDARY Life Crafted Kit and the Legends stamp set to bring this page together. I made use of the digital journaling cards to type up my journaling because I clearly had a lot to say about these photos! I love digital journaling cards for making sure I can get a lot of thoughts into a small space.


When I first pull a page together I like to decide what my primary colors and accent colors will be. You can see that I have a lot of teal and that golden yellow throughout the page. I added a few peeks of pink as an accent. This prevents a page from becoming too overwhelming. I wanted a card that incorporated all of those color so I just made my own. I took a piece of patterned paper from the 6x8 paper pack and cut it down to size. Then I chose some stamps from the Life Crafted stamp set to add to labels. The whole stamp phrase actually reads "little moments that make life big" on one full line. I inked small parts at a time to split it up between the labels. To ink the words in the middle I simply covered the rest with a post it to prevent them from getting inked up. I opted to use a different stamp that had "big" in a different font for the repeated stamping on the last label. A few accents of plus signs and enamel dots and this card was finished!


I always seek to find a balance between busy cards and those with more simplicity on my page. I did exactly that with this journaling card about my daughter and her best friend. I added a vellum phrase sticker for a bit of color and let the focus be on the story of their friendship and my feelings about it.


I wanted a little more of that golden yellow in my page so I opted to print my photo in an Instax size (grab the Photoshop template in the files section of the Citrus Twist Kits Fan Page on Facebook). I printed it in black and white to let it really pop against the golden background.

The teal card with the large white space in the middle just begged to be stamped! I used the Legends stamp set to create this sentiment. Did you know that when you buy the large add on stamps they come with ideas to combine the stamps for different looks? Flip over your packaging and take a look! This idea was too good to pass up.


I appreciate cards with individual spaces for journaling. I find these are the perfect spots for a few quick words about multiple photos on my page. I used numbers from the foam alpha that's included in the Life Crafted Kit to number my photos that correspond with the number for their journaling block. This is a super simple way to let the people flipping through your albums know exactly what photo you're talking about.


And that's it! Pick your primary color(s), pick your accent color(s), and seek a good balance of busy and simple. I can't wait to see your projects with the November 2020 LEGENDARY Life Crafted Kit. Happy creating!


Thursday, October 22, 2020

Documenting Fall with Shannon


Hello there, friends! Shannon here with a spread that I made in my Fall Favorites travelers notebook. When the October add-on kit arrived at my door I knew that it was meant for fall pages. The muted colors and gold are just perfection. I made this travelers notebook myself using cardstock filler and patterned paper for the cover. Since I made it myself, I took some creative liberty and made a few 3x4 "flips" within the notebook. This spread features one of them! I used the dictionary paper as a backing on the flap and then layered it up with a tag, patterned paper, and a ribbon. The blue house grounds it all and ties into the theme of this layout - which is my fall decor.

The opposite side features a photo of my front door. I didn't want to embellish over the photo so I used the 4x6 Bailey alpha stamp to add a sentiment at the bottom of the photo.


The right side of the spread features photos from around my house arranged into photo strips. At the bottom of the strips, I used the October Travelers Notebook stamp and the Ready for This stamp to fill in the white space. I tucked a few pieces from the October add-on kit behind the photos because I can't ever stop layering! And that deer? Well, I'd wanted to use that from the minute I saw it.


The left side of the spread acts more like my title page. I made my title pop from the background by placing it on a piece of darker patterned paper. The gold leaf ties into the gold accents on the opposite page. I knew that I wanted to use the house card on this page so I backed it with the same woodgrain paper for continuity and then added some details around it. The pieces of ribbon add subtle finishing touches. 


And here's a look at the full spread. I really love the contrasting papers backing each side. I tried to stick with mostly neutral colors since there is so much color in my photos.


Did you grab yourself an October add-on kit? I can't wait to see what you make with it!


Wednesday, July 1, 2020

Life Crafted with Marsha


Hey friends!  Marsha here today, and I'm excited to share my first project using the NEW July Life Crafted "Wild at Heart" Kit that just released!  It is so bright and gorgeous!  I also used the Bailey Stamp, this month's Add On stamps, and a variety of digital files.

Here's a look at my Life Crafted layout:


I began my spread by choosing two recent photos of my youngest son.  He loves all things outdoors, and I thought this kit would be perfect for documenting this memory.  I printed one of the TN Basics Digital Papers, recoloring the labels at the top of the page so that they would coordinate with the other elements I planned to use on the spread.  I layered my photo over a dark blue journaling card and used some labels, chipboard stickers, and enamel dots to embellish.  Next,  I added some stamping to the printed labels at the top of the page with the Life Crafted Stamp and the Traveler's Notebook Stamp.


I stamped the date using the Bailey Stamp onto a label from the Printable Cut Apart Elements and stapled it to the bottom of the page.  This alphabet stamp is my new FAVORITE!  I absolutely love the font, and it is the perfect size for using on Life Crafted layouts!


For the right side of the spread, I used a Life Crafted Page Protector #2.  I added a tab from this month's Printable Digital Tags, along with an ephemera label and heart, to add a bit more interest to the top of the photo.  Then, I created a flip-up by layering the photo over a journaling card from the LC Kit.  I stamped a sentiment with the LC kit stamp and a leaf from the This Is Life "Wild at Heart" Stamp.  I typed my journaling onto a piece of white cardstock and embellished with an ephemera piece.  Finally, I used a piece of cardstock to attach the photo and journaling cards, creating the flip-up.  I love using interactive elements on my LC layouts!


I chose another journaling card from the kit and used the black puffy alphabet stickers and the Bailey Stamp to create the title.  To complete the page, I added a chipboard sticker and a few of the bright enamel dots- another favorite from this month's kit!


I hope I have inspired you to document some of your memories using this month's amazing Life Crafted Kit, stamps, and digitals!  I'm excited to see what you create!

xo,