Showing posts with label Little Things Pocket Life Kit. Show all posts

Wednesday, October 24, 2018

Let's Get Digital | Amanda Baldwin


Hi CTK Friends! 

Amanda here, sharing a super fun Fall layout for today's Let's Get Digital post!
I have used the FREE Leaf Frame file with my Silhouette Sketch Pens for a really fabulous mixed media look! 
Here's what I created....

"Small Things, Great Love" 


Isn't this gor-jus?!! All the Fall fabulousness here! 
I have featured the Little Things Pocket Life Kit, and combined it with wood veneer from the Little Things Scrapbook Kit, as well as fussy cut butterflies from the Vicki Boutin paper in the Pattern Paper Play Kit. 
But it's the Leaf Frame File that really makes this layout! 
The Leaf Frame file has been designed by our very talented Nathalie DeSousa, 
& looks like this....
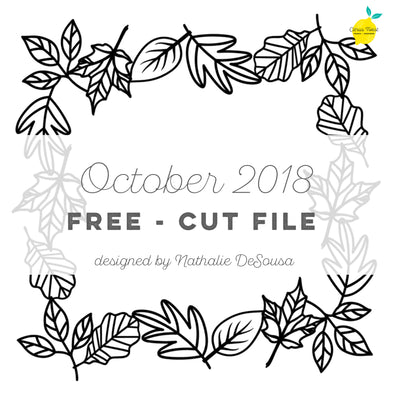

Cut file - FREE - Leaf Frame - October 2018
So awesome!!!
You can download the Leaf Frame Digital Cut File from the CTK Store HERE. 

I enlarged this file so it would frame around edge of my 12 x 12" cardstock base, & then used Silhouette Sketch Pens (Orange & Red ) to draw the enlarged digital file.
I loosely paint the leaves with the fabulous Pinkfresh Studio Liquid Watercolors in Candy Apple, Clementine, Sunshine & even a tiny amount of Lavender! I love the flow and vibrancy of these liquid watercolors! 
Here's a closer look for you.....


Sketch Pens are water soluble, so I use this 'ink bleeding' to my advantage,  & blend to create a little tone within my messy water coloring. I also add a few inky splatters for good measure. So cool! 
Here's another view for you....


Sketch Pens are really good fun, and combined with the Pinkfresh Studio Liquid Watercolors, they're super effective too! 
Those fussy cut butterflies are such a pretty adornment too! 
The laugh veneer from the Scrapbook Kit coordinates perfectly with both the Fall, outdoorsy theme of my layout.


It's also a pretty accurate descriptor of the story in my photo too! Aren't they just the cutest?!

I layer my favorite Fall photo onto that exclusive PL journal card, and then layer die cuts and 6 x 8 pattern paper beneath it all. 
Super simple creating that's tons of fun, and looks super effective! 

And there you have it! My fun take on this month's Let's Get Digital highlight! 
I hope you'll download this FREE file (and more) from the CTK shop HERE, and get a little creative too! 

Thanks so much for visiting, 
til next time, 


Wednesday, October 17, 2018

Travelers Notebooks With the Little Things

Hello, there!  I'm so excited to be back here with you today talking about a couple of Traveler's Notebook pages I created with the Pocket Life Little Things kit and I also combined with a few elements from the scrapbook kit, as well. The colors in the kits are just beautiful and I also really loved the die cuts this month, too!  So, combining those together really helped me make some pages that I love.  I'm working in my All About Me travelers notebook and sharing two of those pages with you.  I love getting to combine these kits together, they flow together seamlessly!

This page had a eclectic feel almost immediately.  The patterned paper background came from the scrapbook kit and lent itself to the photo, too.  [I felt like they went together, for some reason!  Maybe the colors?]  So, with the strong base, it was easy to add the die cuts and journaling, as well. The die cuts are small but not too small and so you can use many of them together and the layering is really fun.


Now, this photo had a different feel thanks to a Snapchat filter and because of it feeling a bit stark, I wanted to match that to the papers and embellishments, as well.  So, the bits fit together like a puzzle
and I love how that black heart from the Shine On Mini Inflatable Heart Ephemera [from the scrapbook kit] not only fits but really stands out.  I love the contrast it provided on this page among the rest of the fairly neutral/pastel embellishments.

Have you picked up the October kits? Do you have any favorite pieces in the kit?  I don't know if I could pick one, but I'd love to see what you are loving and how you're using those pieces!


Tuesday, October 2, 2018

Tuesday Tutorial With Jennie

Hello!  I am excited to share with you today a few steps to using the October [or any!] Citrus Twist Little Things Pocket Life kit in your planners!  I've used the papers, die cuts and stamps in my Happy Planner® and I'm excited to show you show you how I use them functionally and decoratively!


For reference, this is a BIG Happy Planner® which is letter size.  Meaning, the sheets are the same size as a regular piece of paper.  This is the planner that I use as a memory planner.  I put in our regular activities, plus photos, journaling and embellishments.  My most favorite embellishments to add are stamping and die cuts, with punched patterned paper rounding out the top.


One way I like to add stamping is by adding stamping on a piece of cardstock [you could as easily use a piece of patterned paper].  This does two things.  One, it helps you in case you make a mistake or get a little messy. Two, you can add a little bit of variety or visual interest to your page.  I used the Griffin Alpha Stamp to stamp the time of the activity.  I love how not only it looks, but how cost effective this is, as well!


Now, on this side you can see I did a couple of other stamping spots.  One, I simply stamped the time directly to the page.  I am a huge fan of the simplicity.  It's uncomplicated and straight to the point.  I also stamped directly on top of a die cut.  I love this!  It combines function and decoration!

But, stamping is not the only thing I love.  I also love die cuts on my pages, as you can see from the photos I've already shared.


I want to say that this cluster is my favorite, but I'm not sure I can choose!  However, what I can say is that I love that woodgrain frame included in the Little Things Pocket Life Kit.  It IS my favorite. [And I love the woodgrain combined with the black and white patterned paper!] By using several pieces from the package of die cuts, along with a punched piece of the patterned paper included with the kit - I've added an area on my planner pages to rest and look at the details.  I don't add a lot of other embellishing, other than these clusters, if you'll notice. I like to focus on the photos and activities and add decorative spots.


This is a similar idea to the cluster I shared above.  However, due to space AND wanting to have one primary cluster [the first I showed], this one is a bit smaller.  However, I've still included 3 items that have coordinating colors so they are all tied together.


Unrelated, I felt like I hit the jackpot when I saw the words SLOW DOWN included in the package - because these photos of my son on his seventeenth birthday needed these words to accompany them. A little more involvement here, a few more working pieces, but still has the same weight as the other clusters. I don't want any of them to feel like they are vastly different, as they are all the same importance.  But having them slightly varied makes them more interesting, so I enjoy that not one of them looks like the same - even though they coordinate.

Are you stamping or using die cuts in your planners?  Have you tried the die cuts that come in the Pocket Life kits?  Make sure to share with Citrus Twist on Facebook or tag them on Instagram so we can see how!