Thursday, May 31, 2018

Growing in Faith | Tara

Good morning friends! Today I'm sharing a little bit of love for May's GraceBox kit. It's packed with so much color and goodness, I couldn't wait to dig in. I find myself enjoying time with God creating and crafting. I usually take a step back to first read and re-read the verse or chapter a few times before diving in!


I use the YouVersion bible app in conjunction with my NLT bible that I create in. Having different formats available make it really easy to read, go over, and research when diving into scripture. The app also provides a verse of the day. I focused on May 19th's verse (2 Corinthians 4:16), but took it deeper with focusing on the entire chapter, 2 Corinthians 4.


I loved the circle stamp with the hearts and stamped it a few times to create a background. I later added some watercolor throughout the page for more of a pop.


I kept it simple, making a little cluster with the fun gold vine trim and some die cuts. I added some of the word stickers and cut down the long "meet Him in the margins" to fit my journaling page better. I chose a few word stickers that helped highlight some key phrases and take away points from the chapter.


The new alpha stamp is so fun and is the perfect size for all types of projects. I left myself a little phrase of encouragement, "Don't lose heart." This entire chapter really helps bring His light into my life and is such a good reminder of how the best is to come.


I loved using the alphas from April's GraceBox kit with the word stickers. There are so many possibilities!

Here is a closer look at the bottom of my journaling page.


I am often reminding myself to dwell in him and be filled with His Spirit. It's so easy to get stuck in your own way instead of letting Him lead.

I hope you are encouraged to dig deep and find time in God's word along with creating and crafting. What are ways you grow in faith? We would love to see them shared on our Citrus Twist Kits Fan Page or Instagram.

Have a lovely day!
Xxo, Tara


Wednesday, May 30, 2018

Use up ALL your stickers on one page!

Hi guys, Diane here today to share a fun technique I tried this month!


When I saw the Wild Heart sticker sheet in the Embellishment kit this month, I could barely decide which sticker to use first! So instead, I used ALL of them! (Well, most of them anyway).

I started by sticking down my photo and then just put down as many stickers as I could around the page. It helps to start with the larger ones first and then fill in any gaps with some of the smaller ones.


Any left over gaps got a little bit of doodling and then I added a small amount of journalling on top of one of the stickers. This page is 100% busier than my normal pages, but I love it. It feels like a real riot of colour, a celebration. Which is exactly what I was hoping for!


Have you ever used ALL your stickers (or any other embellishment) on one page? I'd love to see, so leave me a comment with a link so I can check them out!

Tuesday, May 29, 2018

Tuesday Tutorial - Altering Alphas

Hello friends! This is Kelly and today I have a fun and simple technique to alter the color of  the puffy alphas by Pinkfresh. This technique works best when covering lighter color embellishments with dark inks. I also recommend to test the color on an alpha that you don't use frequently and for me that is the letter Z.

I started this page with a google search on Mickey images. I knew that I wanted the traditional silhouette, and once I found one that I liked, I imported into in my software and traced the image for this cut file. I also went ahead and messily stitched around the outline with black thread to emphasize the outline.


I don't usually gravitate towards themed products, and as a result a large number of my Disney photos have not been scrapped. The Malibu kit and the Paradise Add-on both had several pieces that I thought worked well with these photos, and inspired me to create another layout for my Disney album.


I wanted to document the park that we were in this day with the initials somewhere on the page. The Pinkfresh alphas were perfect, except the gray color did not stand out on the label with the rest of the black elements on the page. I used a black Copic marker and applied a few coats of ink to alter the color. I left the alphas on the sheet to make it easy, allowed them to dry in between coats, and then peeled them off and adhered them to the label. 


The one other embellishment that "needed" to get on this page was from the chipboard phrase from the Paradise Add-On kit. The phrase works perfectly for Disney photos as well as every-day photos. 


Here's a peek at how the layout came together. I hope that you will try this technique the next time you need a different color alpha. Thanks so much for stopping by today and I hope that you have a great day!


Monday, May 28, 2018

Cute & Wild at Heart

Hi dear CTK friends! Anna here today sharing another page made with the gorgeous CTK May kits.
I've also used one of the fabulous Free CTK cut files, love them.
My design is actually inspired by one of my pages made with the April kits where I made a watercolor backround combined with a cutfile.

Well enough babbling, here's what I came up with using the Main kit, Embellishment kit and the Add On kit.


I fussy cutted out some of the small happy circles from the  Shimelle Glitter Girl papper to back the cut file which I've first painted with some color mist.

My youngest girl loves leaopards and always wear her leopard ears so I figured this was a perfect fit for this photo of her.


Thanks for stopping by here today! Be sure to join us over at the CTK Fan page and have a look at our new beautiful store and website.

Take care! Hugs Anna xo

Sunday, May 27, 2018

Sunday Sketch with Veera

It's Sunday and that means a new weekly sketch!


This sketch is fun and gives a possibility to use two photos. As I normally use only one photo per layout I thought I show you how you can do that also with this sketch.


Instead of using two photos I used one photo and one square card from May ephemera pack. This way I have two fairly same size elements as my main focus point. I followed the sketch fairly closely as I really liked the elements in the sketch.


Now it's your turn!  To play along with this week's sketch and to be eligible to win a $5 gift certificate to the CTK Store,  create a layout based off of this week's sketch and upload it to the CTK Facebook group with today's date (05/27) in the description. Can't wait to see what you all come up with!!

Saturday, May 26, 2018

3 to Inspire with Jessy

Hello there!! This week at Citrus Twist blog, I'm hosting 3 to Inspire challenge for this week. 

This week's 3 to Inspire prompts are:

1. Create with stickers. 

2. Use medium (mist, ink, gesso).

3. Stamping.

Here's my take on the challenge using the May GraceBox kit. 

First, I started with doodling circles with the oil pastel. I used water to blend them for the watercolor effect. Then, I stamped the dots all around the page. Next, I chose the acetate words and positioned somewhere in the middle of the page. I filled up the top and bottom space with lots of stickers in different colors. I loved all the sentiments. Perfect to describe who our God is!

Completed the page with more light stamping with the hearts, really loved how the page looked!


Please join in the fun and upload your take on this challenge to our Citrus Twist Fan Page on Facebook, in our gallery, or on Instagram and tag us, @citrustwistkits. I can't wait to see what you do with the elements!

Thanks for stopping by!
Xoxo Jessy


Friday, May 25, 2018

PL Challenge with Adele

Hi lovelies!

I have been steam rolling through some PL pages lately and have really been enjoying trying to use as much of each month's kit as possible before the next month's arrives! There's so many awesome goodies packed into each month's kits that I always have a plethora of embellishments, papers and cards to choose from.


I often feel a little overwhelmed when I get my latest monthly goodies because there's so many rad choices of what to use! It's nice to sometimes have a challenge to focus your design choices and not get too dazzled by all the pretties.


This month, I challenge you to incorporate the following three elements into your PL page (or if you want that extra challenge, into a layout!):

1. "Ghost" stamping (repeatedly stamping without re-inking);
2. A colour that is not your typical "go to" colour;
3. Digital journaling on a photo before printing.


I love challenging myself to include a small subtle difference in my pages to give my scrappy mojo an extra boost. I don't often reach for green, but decided to try to embrace it a little this week hehe!!


I love the final look of my page, the teeny little details and handwritten journal spread amongst the hints of green and stamping.


I've create a fun little process video of this page too, so grab your latest kit and get scrappy with me!

Adele


Thursday, May 24, 2018

Clean and Simple Layout Inspiration | Kathleen GraumĂĽller

Hey friends, it’s Kathleen here again, unfortunately with my last post as part of the Citrus Twist Kits creative team. I absolutely loved being on the CTK design team, but since things have gotten a bit hectic around here (at home, not at the CTK blog ;) ), unfortunately, I had to step down from this design team.

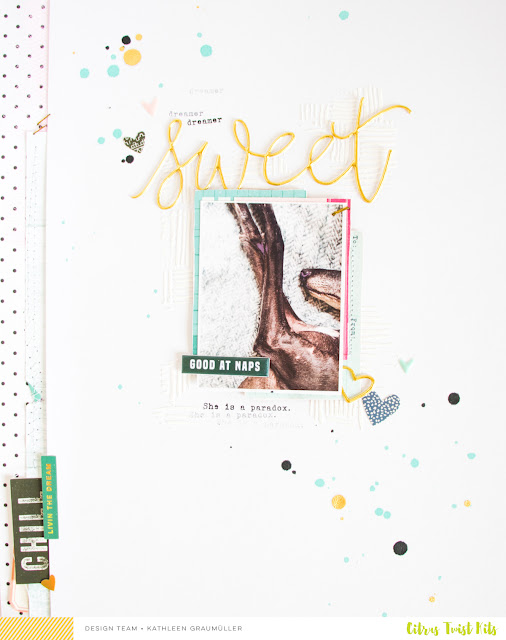
But let’s focus on my project for today! I thought I would share some inspiration for a clean and simple layout that I made with the beautiful May "Malibu“ scrapbooking kit. I used one of the iNSD sketches as inspiration for this one.

Sweet by ScatteredConfetti. // #scrapbooking #citrustwistkits


 When making a clean and simple layout, what always helps to add some interest to the page, is to use different textures. On my layout I not only used the patterned papers, but also part of the pink tulle that was included in the kit (as part of the border on the left, it’s a bit hard to see in the photos), different embellishments (like the gold puffy stickers, the cardstock stickers), some machine stitching and the white modeling paste.

For that last one I used a stencil from my stash that kind of reminded me of the blanket’s structure (which you can see in the photo). I love the look of white on white because it adds some interest to your layout without adding more colour or patterns, so it doesn’t get too busy.

Sweet by ScatteredConfetti. // #scrapbooking #citrustwistkits

I hope this layout inspires you to try the clean and simple style yourself :)

And since this will be my last blog post, I thought I would also share some of my favourite layouts that I made with the Citrus Twist Kits over the past eight months (and it was really hard to choose - the CTK kits really pushed me to try new things):

Favourite Layouts by ScatteredConfetti. // #scrapbooking #citrustwistkits

Thanks so much for stopping by and I hope you have a great day!

Wednesday, May 23, 2018

Fussy Cutting with Kira

Hey friends!  It's Kira and I am back with a 12x12 scrapbook layout featuring some fussy cutting.  If you aren't a fan of fussy cutting...don't worry, I chose the easiest paper for this!  Even the fussy cutting haters won't mind.  ;)


I started with the Heidi Swapp Pineapple Crush "Good Vibes" paper.  I didn't necessarily have an end goal in mind when I start this layout so I just started cutting out hexagons from the paper.  I fussed around with those for a bit, then cut the hexagons into diamonds and chevrons.  Still no plan.

So I kept cutting.  Lol.  I had cut about 1/4 of the paper and decided to sort the diamonds and chevrons by color.  I am definitely a color scrapper so this made it easier for me to determine a design.


I started playing with a pattern on my paper, alternating between a diamond piece and a chevron.  Which eventually turned into a circular shape.  So I thought a few of these on a page might be cute.  I laid out a pink, yellow and blue shape.


Once I had placement approximately where I liked it, I lightly traced around the shapes so I could place some mixed media behind them.  I stuck with some light, subtle watercolor and the packaging technique.  After that had dried, I adhered the shapes to the page over their coordinating colors.  I decided to add some machine stitching down all of the diamonds and chevrons for some additional texture.


The embellishing was rather easy since I decided color blocking would look best.  I went thru all the embellishments in the main, PL and embellishment kits and sorted them by color.  Then added a few of each color to the coordinating shapes.


Thanks for stopping by!

xo, Kira

Tuesday, May 22, 2018

Tuesday Tutorial – Stamping

Hello CTK friends! Melanie here today to share a fun stamping tutorial!!! CTK has so many wonderful stamps, I thought I’d show you how I like to combine my stamps to create unique embellishments for my projects, in this case a PL spread. Using the Delish stamp, Candid Camera, along with stamps from past CTK kits and the Malibu Pocket Life kit, I created fun accents for my PL spread. 


The stamp frame from the Delish Stamp Set was the base for my stamping, afterwards it was simply combining a larger word/phrase stamp with a smaller word/phrase stamp, making sure that each saying complimented each other. This was a fun exercise in using my supplies and seeing which stamps coordinated well together.


Since I like to work with odd number of items, I created 5 stamp vignettes to use on my spread. Each stamp highlighted the theme of the picture.


To complete my spread I used the PL cards from the Malibu Pocket Life kit along with various embellishments from the same kit. Love the beauty and versatility of this kit, ideal for any type of pictures and stories.


The end result is a simple but unique PL spread that recaps the story of my family. Love this project, love that it enables me to preserve our stories and special moments but also to tell the story of little things that bring my joy and happiness.


Don't forget to share your projects with us on Instagram and hashtag #citrustwistkits and on our Facebook page so we can leave you a little love!

Happy crafting!!!

Sunday, May 20, 2018

Sunday Sketch with Nathalie


Hello everyone!  It is Sunday, which means time for a new Sketch , and this one is such a fun and versatile one.


Gotta love all those layers behind the picture.  Well,  I used this month's Malibu Scrapbooking, and Embellishment kits to create my take on this week's sketch.


Sketches are a great starting point for projects, and  i chose to remain true to the sketch after flipping it 90 degrees.


All the layers behind the picture are created following the ones in the sketch.   I even used the Circle Punch Cut file to create the layer that sit behind the picture from one of the papers in the Scrapbook main kit.


I was so excited to see the small music sheet in the Malibu Main Kit, and used it in this page to convey the sentiment of the picture.   The pink tulle also was added as a layer behind the picture.


To bring a bit of texture to the page, i added some mixed media so that it just peeks from under the paper cluster.


The only difference between the sketch and my page (besides the rotation) is that i replace the long thin strip of paper for the gold puffy leaves from Crate Paper's Flourish collection that are included in the main kit.    The following video will show you how this page came together:


Now it is your turn to be inspired to create a new project using this week's Sketch.  I cannot wait to see your take on this sketch!  Remember to use today's date when sharing your creations on the CTK Fans Facebok Page, or by tagging #CitrusTwistKits when sharing  your creations on social media.


Have an awesome week!

XO

Nathalie