Thursday, September 29, 2016

Make Your Layout interactive

Hello at the end of this lovely month!

It's Mira Jurecka here and today I'd like to show You a very nice and simple (yep yep yep!) idea how You can make Your pocket album a bit interactive and even more fascinating. So let me share what I have for Ya!

I created a single-page layout to include in my pocket album:


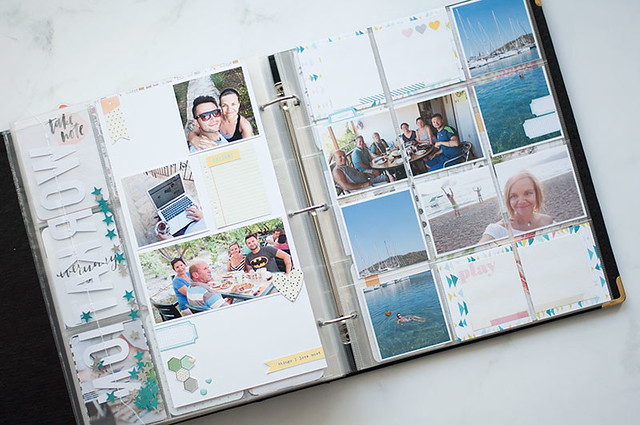
I really love this picture of my daughter and I. Since I'm rarely appearing in our family albums it had to find it's place in my album - that's for sure! In a HUGE format of course! Thanks to the products from September PL + Embellishment kits I was able to embellish this picture just the way it was supposed to be treated!

Huge picture + two fancy papers from mini-paper pad and a lot of stickers and paper elements! Niiiiice!
Yet, I was still missing something here!


Look at our faces:


We are smiling, looking happy, but this wasn't enough for me! It wasn't fancy enough!
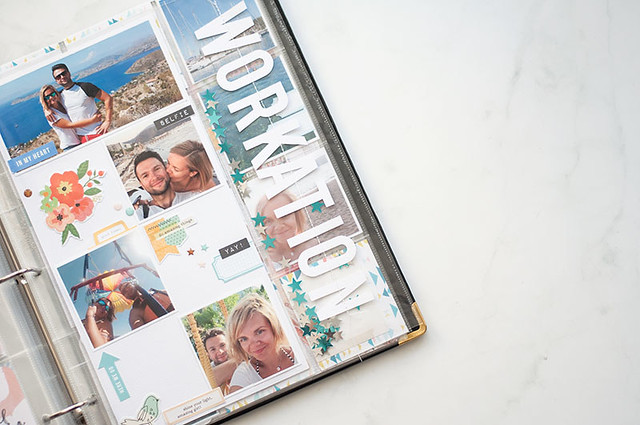
Then I saw those paper glasses in PL Kit! Perfect match!

...but I was scared to change the picture that I love so much into something totally different. Funny but 100% different! What would You do in this situation?


I was trying the glasses on and taking them off, trying on and taking off - couldn't decide what to do!

And then the AHA-moment came! I realized that I can create even more fun - just by attaching the set of glasses to the page protector and use it interactively instead of adhering them to the picture for good!

Now this is how I imagine the future: Ola and I are watching the album and we are playing with these glasses TOGETHER! Trying them on and taking them off!! And laughing a lot! Isn't that fun!?
So simple!
Single paper clip can make such a huge difference!


I am really happy that these awesome star clips were included in September Embellishment Kit! They just made this layout super royal!

I hope my idea will push You even further and that You will try to find more tricks for Your albums! Don't forget to share them with me! And if You already have one, please share them too!

Now I can only wish You a very happy scraping!

Thanks for reading!
M

Wednesday, September 28, 2016

Almost a double page layout with Veera

Hi, it’s Veera and today I’m sharing two layouts I did with September Add-On Kit and Pattern Paper Play #1. I used the same striped pattern Paper from Crate Paper as my background.


I really loved the diagonal stripes on the paper and used it as a guide where to place the pictures. Both of the layouts have similar elements like doilies, mist splatters and gold accents.


After I finished the layouts and looked at them side by side I realized that these would actually make a great double page layout too if just the stories and pictures would have matched. So I almost made a double page layout, right?

-Veera

Tuesday, September 27, 2016

How to break of the routine in pocket scrapbooking - 5 ideas to try right now!

Hello! It’s Kasia here with a little pocket scrapbooking tutorial - or maybe I should call it inspiration - for you all!

ctk10

I love my pocket pages and I’ve been pretty good with working on my album this year but to be honest the process of creating pocket life pages can get a bit … boring. You know it’s fun but it can get quite repetitive and after 9 months of it I was itching to try something different.


CTK4

The opportunity came with photos from our recent holidays! I pulled out September Citrus Twist Kits and started playing right away! 

I decided that this time no pocket will stop my creativity and today I want to share some tips and ideas how to break out of the rut in your pocket scrapbooking!


EXPERIMENT WITH DIFFERENT LAYOUT
If you constantly use the same design of page protectors go and try something new! For todays spread I used the 12x12 page protector and trimmed it to 9x12 inches. Than I used my fuse tool to make 2 big pockets that separated my page protector into 3x12 and 6x12 inches parts. This new design felt really fresh and different!


CTK§


USE YOUR TOOLS
On the daily basis I usually forget to use my tools while creating the album. Do you have the same problem? I challenge you to go bold with your tools! To create today’s page I used my Silhouette (I cut the title “workation” with it), my sewing machine (I stitched the title on the top of page protector) and Fuse Tool which helped me to create page protector and close the pocket in which I threw lots of star sequines.


CTK2


GO BACK TO BASICS
When I first started scrapbooking I used to make lots of layouts and mini albums. I never came back to them when I started pocket scrapbooking, I didn’t feel that I need to until … the day I was making the holiday’s pages! You could create a scrapbooking layout and place it between your pocket pages to add some interest to your album. If you need inspiration check our Sunday Sketch category - you will find plenty of inspiring layout sketches in there!


CTK3


PLAY WITH PHOTOS
Don’t let the pockets on your page protector dictate what kind of pictures you can use. Print some bigger photos and cut them to fit the pockets (be careful not to cut through someone’s face - it never works well!) - panoramas and pictures with a view work great with this technique. On my page I built a composition from 4 pictures cut in half - I love the effect!


ctk8


BREAK SOME RULES
Breaking rules every now and than is such a great feeling! Come on, documenting memories and pocket scrapbooking should be fun! Cut your pockets. Put the things on top of them. Built some layers. Play with textures. Mix and match photos. Go bold with emebellishments or maybe try some mixed media in your album? It’s your project, your memories and your hobby - have fun with it!

ctk6


Monday, September 26, 2016

Travel Notebook Using Scrapbook Sep Main Kit With Evelyn

I love the new media such as Travel Notebook to do memory keeping! Such a new way for me beside creating 12x12 or 8x11 scrapbook layout. The small size of TN make my memory keeping so easy and fast! Here two spread of my TN using CTK Sept Main Kit 2016.


Here is my 1st TN spread! I use my TN to do memory keeping about my son, me and my coffee. But this time I create spread about him. I did layering with the ephemera die cuts behind the photo and still be able to use those chipboard. To make it balance between the right and the left side, I place the XOXO in the bottom of the page and let the white space blank like that. 
If you do the TN Spread no need to worry about the technique. I still can do some stamping here.

Here is another spread:
Another boy spread using Scrapbook Sept Main Kit 2016. This is the best way to play with your extra paper and embellishments! 
 I paste the photo right in the middle of the page. Again I still can do some layering behind the photo so if you are technique maniac you still can do some of it. 
I prefer to write down what I thought or my opinion or my dream and hope about my son. TN is perfect for my small and tiny hand journal. 

If you are newbie in Travel Notebook things, don't worry I'm a newbie too! Just give it a try and be confident, no need to make the page look so full. Remember the point is how to do memory keeping not how pro you decorating it! *wink*

Love Evelyn


Sunday, September 25, 2016

Sunday Sketch with Brooke

Hello!  Happy Sunday Sketch day! 

Brooke here to share this week's sketch inspiration.


Here's my take...


I used the sketch composition almost exactly and translated it into a notebook project. 

As a huge fan of traveler's notebook projects, let me tell you, using a sketch as a starting point makes this type of memory-keeping even more efficient than it already is. 


The September kits were packed with amazing pieces, like these tags, that are so great for layering. 


Then lastly, I chose to journal around the entire spread.  I use this technique when I want to pull all the elements of a project together.  It's like tying a bow on a present....the journaling wraps everything up, nice and neat.

A few puffy star stickers and I called this one done! 

I do hope you're inspired to start creating using this week's sketch.  It's a simple, classic scrapbook sketch that can easily be translated to so many other projects, like cards and pocket pages or even a traveler's notebook spread, like I shared here.  Don't forget to use the hashtags #citrustwistkits and #ctksundaysketch so we can all admire your work! 

Thank you so much for joining me today.  Happy crafting!

Saturday, September 24, 2016

3 to Inspire with Marie-Pierre

Hi everyone!

After taking a long break to move to Europe, I'm so happy to be back to the Citrus Twist Kits blog! :) I hope you are ready to get inspired! I have a Project Life spread for you today!!


The September Pocket Life kit was totally my style! I loved every little bits and pieces!

This is the left page:


And this is the right page:


Here are some detail shots.


To "type" on this little typewriter die cut, I used my printer. I typed my text in Photoshop, the first "adventure" is written in dark grey and the second one in light grey and then I printed it on a plain piece of paper. I taped my die cut over the text and ran the sheet again through the printer. I used to have a typewriter but I found that the process was pretty much the same to type on die cuts or cards. I find that by using my computer, it's easier to center my text and I like that I can adapt the size of the text for what I need.


I used a small label and some puffy alphas to write a title on my journaling card.


I found this house card so cute that I didn't want to mess it up. I only wrote some words on it and finally decided to add a star (from the embellishment kit). Sometimes, simple is just the better way to go!


I turned this 6x6 paper into a 4x6 journaling card. And I even stamped a bit... :) Makes me happy.


Here again I used the puffy stickers to write a title for the right page:


And I used the 2 little birdies die cuts to guide the eye between these 3 photos that are linked together.


I stitched a little bit. I stitched the label under the "the container is here" title and I stitched the black and white heart die cut in the middle of the photo. I added a small word label that I mounted on foam dots.


This paper with the cute houses has to be my favorite! I decided to let it shine! I added a sigle label on top of it to add just a bit of journaling.

And now here are your 3 prompts to get you started:

- Use your favorite card or paper and let it shine by adding only one simple thing to it.

- Use small alphas to create a title or 2.

- Try some stitching. It doesn't have to be a lot and it doesn't have to be with the sewing machine. Just get a needle and sew something into place.

Have fun!!! And don't forget to share your 3 to Inspire creations in the gallery and/or our Facebook Forum. I can't wait to see what you make!!

Marie-Pierre

Friday, September 23, 2016

Pocket Life sketch Friday with Alena

Hello everyone! It's Alena here today with Pocket Life Friday. I am going to share with you my new PL spread using the September 2016 "Maggie" PL Kit + September 2016 Embellishment Kit

 And for your Pocket Life sketches...


And my PL for your inspiration.

For your chance to win, create a layout based on the sketches in this blog post, post your layout to our Gallery or our Facebook Fan Page by Friday, September 30!

Wednesday, September 21, 2016

Bible Journaling with Jessy Christopher

Hello there again! So excited to share with you what I have created in my journaling bible with the September Grace Box kit. Each month, I always look forward for GraceBox and see what God has installed for me through my art & craft process. I love spending my time in God's presence and allows Him to speak <3

Without further a due, let me share with you my creative process on how I created in my bible....

PSALM 145:8-9 
The Lord is gracious and merciful, slow to anger and abounding in steadfast love.

The Lord is good to all, and his mercy is over all that he has made.

Firstly, I used a plastic card and spread Nuvo Moussed onto the page. I really love the Nuvo Mousse. as it is fast drying and it gives a metallic finishing too.  


Once that is dried, I spread some gesso on top of the Nuvo Mousse. I wanted to add a little texture and fill up the gaps with it. 

 Next, I took out the Simple Stories bits & pieces and begin to position onto my page. 
Once I'm happy with the positioning, I adhered them down and continued with stamping. 


To finish up, I filled the top and bottom portion with brush lettering & more stamping to complete the look. 

Here are the close-up shots : 


Here are two more entries that I created with September GraceBox...


Thank you for letting me share today! Be blessed :)
Xoxo Jessy