Showing posts with label citrus twist exclusives. Show all posts

Friday, December 23, 2022

Life Crafted Inspiration with Shu-Wen


Hey everyone!

It's Shu-Wen here, sharing my last blog post for the year! In this post, I'm sharing some inspiration for my 6x8 December Daily Life Crafted Album, featuring the December 2022 "Winter Magic" Digital collection and ephemera pieces! 


Ever since I first saw the Christmas tree cut file from the "Trim the Tree" cut file set designed by Ashley Horton, I knew I wanted to back it with patterned papers to use as a feature page in my December Daily album. The weather outside has been dreadful here in Alberta, so it's been perfect for staying indoors and crafting! I find backing cut files a very "hygge" experience, it's relaxing and allows me to take some time just for myself as I sip on some hot chocolate. I backed the cut file with some papers from the "Winter Magic" Traveler's Notebook Digital Papers set, because I thought the wintery teals and greys in would be perfect to reflect the frigid temperatures we've been experiencing here towards the latter half of December. So although I was originally planning on using this as the base of a layout documenting our cold temperatures, I decided to make it into a vellum overlay instead to serve as the title page for volume 2 of my December Daily albums this year!


I had fun playing around with the placements of the patterned papers beneath the cut file, making sure to include this little blue bird within one of the tree outlines! ^_^ After I finished backing the cut file with various patterned papers, I added my title using some Black Puffy Alphabet Stickers to spell out "2022 December", and added an ephemera piece from the "Winter Magic" Die Cut Ephemera Pack for the word "Daily". I had initially tried a light mint green font for the alphabet stickers to go with the wintery greens of this collection, but ultimately went with the black font instead because it made the title stand out a bit more from the background. Then, I scattered numerous enamel dots in coordinating colors onto my vellum page, focusing most of the enamel dots towards the center of the page where I had my title. I took these enamel dots from a couple of different packs from the Citrus Twist Kits line, including the "Flea Market Findings" Enamel Dots and the "Jewel" Enamel Dots. I also made sure to include a variety of sizes of these enamel dots, evenly distributed across the page. 


Here's a final look at how my title page turned out! I'm looking forward to layering this on top of a bright wintery photo outside, that is, if it ever gets warm enough that I want to stay outside for a bit to snap a photo! XD I love the ethereal look of this cut file floating on the vellum page, and the wintery colors of this kit certainly give me winter vibes as well! 

I hope this inspires you to look at using cut files and vellum as cover pages for your albums!  If you're creating a layout inspired by this page, be sure to tag me over on Instagram @ChouxPuffCreations so that I can see what you've created, and make sure to share you layouts over on the Citrus Twist Kits Facebook Page as well! Thanks for stopping by!


Saturday, August 27, 2022

3-to-Inspire with Shu-Wen


Hey everyone!

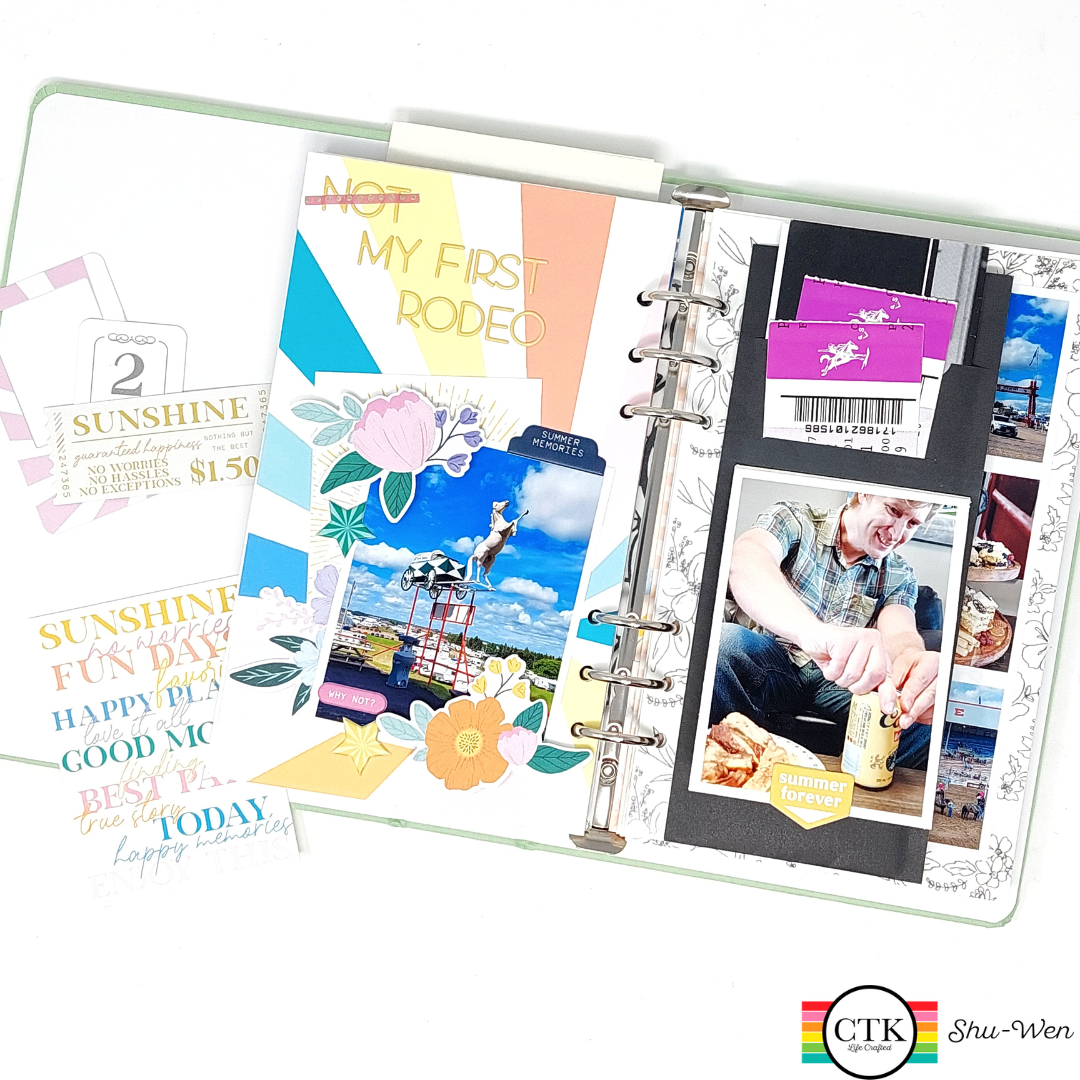
It's Shu-Wen here, sharing a spread that I created in my Life Crafted Album documenting my first trip to the rodeo! This spread features some components from the Sunshine Mini Kit that was released this month, and the summery sunshiny goodness in this kit was perfect for documenting a (mostly) sunshiny day!

Here's a photo of my layout for today:
And here are the 3 prompts for this week's 3-to-Inspire!
1) Layering
2) Real-life Ephemera
3) Digital Journaling Card

I started off the left page of my spread by layering a photo that I took from the rodeo with one of the digital journaling cards from the Sunshine Digital Journal Cards set to create a bit of contrast with the rainbow starburst patterned paper that I printed out from the Sunshine Traveler's Notebook Digital Paper set. Then, I layered in some of the floral ephemera pieces from the Sunshine Die Cut Ephemera pack, making sure to pop some of them up with 3D foam tape, and added in a few puffy stickers from the Sunshine Puffy Stickers sheet for some more texture and dimension. On the top of that page, I added my title "Not My First Rodeo" using the Sunshine Puffy Alphabet stickers from the mini kit, crossing out the word "Not" with some of the thin washi tape from the Explore Mini Kit from a couple of months ago. I loved this as my title because it's a play on the commonly used phrase "Not my first rodeo", since this was actually the first rodeo I had ever gone to. 


For the insert in between my two Life Crafted Album pages, I decided to use the paper sleeve that held my plastic cutlery, provided to us with the dinner for the event, to hold some extra bits of real-life ephemera: the tickets from the event, as well as the program for the day's schedule of events. At the bottom half of the paper sleeve, I included a photo of my boyfriend enjoying some refreshments, as well as a flip-up to hold some journaling that I printed out using another one of the digital journaling cards. To serve as a handle to flip the journaling card up, I adhered one of the tab stickers from the Sunshine Chipboard Stickers sheet, making sure to overhang the bottom arrow of that tab over the edge of my photo and removing the stickiness from the back of that arrow tab with my embossing powder tool. Next, I adhered one of the Life Crafted Adhesive Strips to the back of that paper sleeve, which allowed me to put the paper sleeve into my album without having to punch holes through it! 


On the back part of that paper sleeve, I included yet another digital journaling card with more journaling on it, as well as a small photo at the very bottom. I decorated the page with the heart-sunglasses ephemera from the ephemera pack and a chipboard sticker at the very bottom. For the right page of my layout, I decided to keep things simple by letting my grid of 4 photos do most of the work; I only used two circle embellishments from the chipboard sticker sheet to finish off my page!


I hope you decide to give this 3-to-Inspire challenge a try! I especially loved incorporating my real-life ephemera into my layout as an interactive element in my album! If you'd like to create a layout featuring real-life pieces of ephemera, be sure to tag me over on Instagram @ChouxPuffCreations so that I can see what you've created, and make sure to share you layouts over on the Citrus Twist Kits Facebook Page as well! Thanks for stopping by!


Sunday, December 19, 2021

Sunday Sketch with Shu-Wen


Hi everyone!

It's Shu-Wen here, sharing a spread that I created in my Life Crafted Album with the new December 2021 "Fernwood" Add-On Kit available in the Citrus Twist Kits shop!

Here's the sketch that I used to create my spread:


Since this sketch was made in a portrait-style orientation, I decided to use this sketch for the design of the left side of my layout and pair it up with a full-page photo on the right side of my layout.


First, I created the base of my layout by cutting strips of patterned paper to mimic the stripes across the page in the sketch. I decided to use all blue patterned papers for the colored stripes, going from darkest at the top to the lightest at the bottom (papers used: "Into the Woods", "Fable", "Fernwood", and "Focused", all from the Vicki Boutin "Fernwood" collection). I chose the "Keepsake" patterned paper from the Maggie Holmes "Chasing Dreams" collection for the bottom-most wider piece of patterned paper; I purposely chose a neutral, lighter colored patterned paper in case I wanted to add my journaling later on. I held the pieces in place with some light adhesive, then stitched them together with my sewing machine to add some texture, similar to the stitch marks in the sketch. 

Next, the film strip die cut from the Vicki Boutin "Fernwood" Journaling Ephemera pack was perfect to use in place of the panel with the 3 squares in the center of the sketch. I chose to back the top and bottom ones with small photos. For the middle frame, I created a small shaker pouch to hold some of the floral shaker sequins that I received in my Citrus Twist Kits package (I always save all these little gems from my packages!) and embellished it with a heart die cut from the "Take It Inside" Die Cut Ephemera Pack available in the Citrus Twist Kits shop. Then, I backed the film strip onto a leftover piece of the "Keepsake" patterned paper to give it enough contrast to stand out from my background. 


For the embellishment clusters, I decided to use some more die cuts from the "Take It Inside" Die Cut Ephemera Pack; I love how the florals in this ephemera pack go with the colors from the Fernwood Add-On Pack! I also added a bit of thread behind my floral clusters to add a bit more interest, similar to the floral clusters in the original sketch. 

For the bottom of my spread, I decided not to type up any journaling. Instead, I filled up the bottom of my spread with one of the ephemera pieces from the "Fernwood" Journaling Ephemera Pack that says "Happiness is..." and finished the title with the "Right Here" Thickers from the "Stories of Us" Thicker sheets in the Add-On Kit. The letter "G" did overhang the edge of the page a bit, so I trimmed the bottom part off. 


For the right side of my spread, I printed out a large 5" x 8.25" photo from our fall photoshoot; I love how the warm, deep colors in the "Fernwood" collection go with the autumnal colors in our photos. I kept the embellishments simple with another ephemera pieces from the "Fernwood" Journaling Ephemera Pack that says "Smile", some more stitching detail for added texture, and a few butterflies from the "Stories of Us" Thicker sheets.


I love how this spread came together so easily using a sketch for one side of my layout and a full page photo for the other side. Also LOVING the colors in the "Fernwood" Add-On Kit and looking forward to making another project with this kit later on this month! If you decide to make a layout using this sketch, feel free to tag me on Instagram or on the Citrus Twist Kits Facebook Fan page so that I can check it out! Make sure to check out the Citrus Twist Kits Shop for all the new goodies this month! 

Thanks so much for stopping by!


Thursday, October 22, 2020

Life crafted with Marivi


Hello again!
Today I am here to show you what I have done with the Life Crafted kit from October. I have also added some details of Add-on kit


On this page I have used the paper with gray tones and another with orange colors.
At the bottom a sticker with a word and some puffy Crate Paper details.


Here I have also added a small sticker, to match those on the other page.


Here you can see the ornaments in more detail, as you can see I have also placed two enamel dots, one green and the other yellow to contrast with the rest of the colors.


On the other page I have written a little and in the center some puffy houses and a stamped phrase.


In this project I have used vellum and a craft paper.
I have used the velum to veil the stars, hearts and the leaf that I placed as a background.


I have sewn the velum and on top I have glued enamel dots and I have used a stamp.


On the stamped paper I have pasted the title, and some strips with phrases.


With the photo I have pasted a golden flower and a puffy sticker.


In this photo you can see in more detail how I have sewn and placed the background.


Thank you very much for stopping by, and see you soon!


Thursday, October 15, 2020

WatercoloredChristmas Cut Files by Sarah Bargo


Hey paper peeps! Sarah Bargo guest designer here with a fun little technique I’d like to share with you! I am using my gorgeous “Sparkle & Joy” kit to document a Christmas cookie decorating party I hosted last year! It was so fun and festive, it matches the colors in this kit perfectly!


When I saw this gorgeous noel cut file with all the leaves cut out, I knew I had to create a fun page with it! One of my favorite things to do with cut files is take them and dip them into inks and paints to create a fun artsy watercolory look!


It’s super easy I hope you’ll try it! Grab your craft mat, a water spritzer, a little paintbrush,  your Tim Holtz Pine Needles Oxide Ink Pad, and your Tim Holtz Spun Sugar Oxide Spray!

For the Noel cut file, spray some of the Pink Oxide Spray onto your craft mat, then spray a little water into it to make it thinner. Dip your cut file in it in different places, and move the paper around so the drips and drops run all over the page. If you’d like it to move more, lightly spritz the ink on the cut file with water. Keep doing this until you get the look you want!


Then, die cut or hand cut some cute holly leaves. Smush your Pine Needles Oxide Ink Pad onto your craft mat, and spritz it with water. Using your little paintbrush, start applying the ink to the leaves in random places! You can dip them too if you’d like! Do this until you get the desired look you want!


When the leaves are completely dry, take your cute Citrus Twist Kits “Sparkle & Joy” stamp set and stamp directly onto the leaves using the same Pine Needles Ink pad! I used the cute “Jolly” word over and over!


Then after they are completely dry, staple your leaves directly onto your page, topping it off with a cute chipboard flair!


I thought it’d be funny to put a page behind the cut file and stick my funny face in the hole lol!


Here’s a look of the whole layout and the page to the left of it:


I just love these number cut files! I ran this 24 through my Big Shot with an embossing folder!


Here’s a look at the page behind the cut file, super simple with some of the darling puffy stickers in the “Sparkle & Joy” kit!


Thank you so much for stopping by, and I hope I’ve inspired you to get a little inky today!

Xoxo Sarah


Thursday, June 11, 2020

Life Crafted with Marivi


Hello everyone,
I hope they are all well and that little by little it seems that we are returning to normal.

This time I show you a double layout, with the sheet folded, on the "cover" a photo with two vertical strips of paper and on top I have placed the title with the puffy alphabet, the first word I have superimposed it, and I have stamped it .


Inside, the page on the right, I have placed the same paper as on the previous page, with a label with a phrase and some decorations.


I have decorated the photo with several strips of paper, one of them I have folded and sewn to make a banner.

I made the title with a stamp and then I cut it, just like the little ice cream at the bottom.


 On the label various details and a puffy star.


On the banner I have put a puffy sticker and another word sticker.


The pieces of yellow flower paper are sewn too, creating margins to decorate.And I have also added splashes on both pages.


I hope you like it and it helps you to create your projects.
See you soon.