Showing posts with label add on stamp set. Show all posts

Sunday, September 10, 2023

SUNDAY SKETCH with Lory


Hello everyone! How are you?

It's Sunday, already the second Sunday of September and this means ... Sketch  Challenge :) And this happens to me just when it had to happen, it's a long period, I'm renovating my house so we are all at my mother's house and it's so complicated but I want to try to find something positive everyday! So scrapbooking, as always, saves me from the darkness ;)

Here it is the sketch for this week challenge


And here my entry, it's a 9x12 page layout


I have used all the September supplies that are gorgeous! Two pics,  a large title and many little details made with the stamps of this month, Storytelling v2 and Simple Words 5 All About Me 

With stamps you can create amazing details for your pages. Just with different color inks.

Here some details


In the end the Full version of my page:)


Hope you like the page, believe me you will love the new products in the shop.

Have a lovely Sunday everyone.

Love, Lory


Sunday, April 3, 2022

Sunday Sketch with Aimee


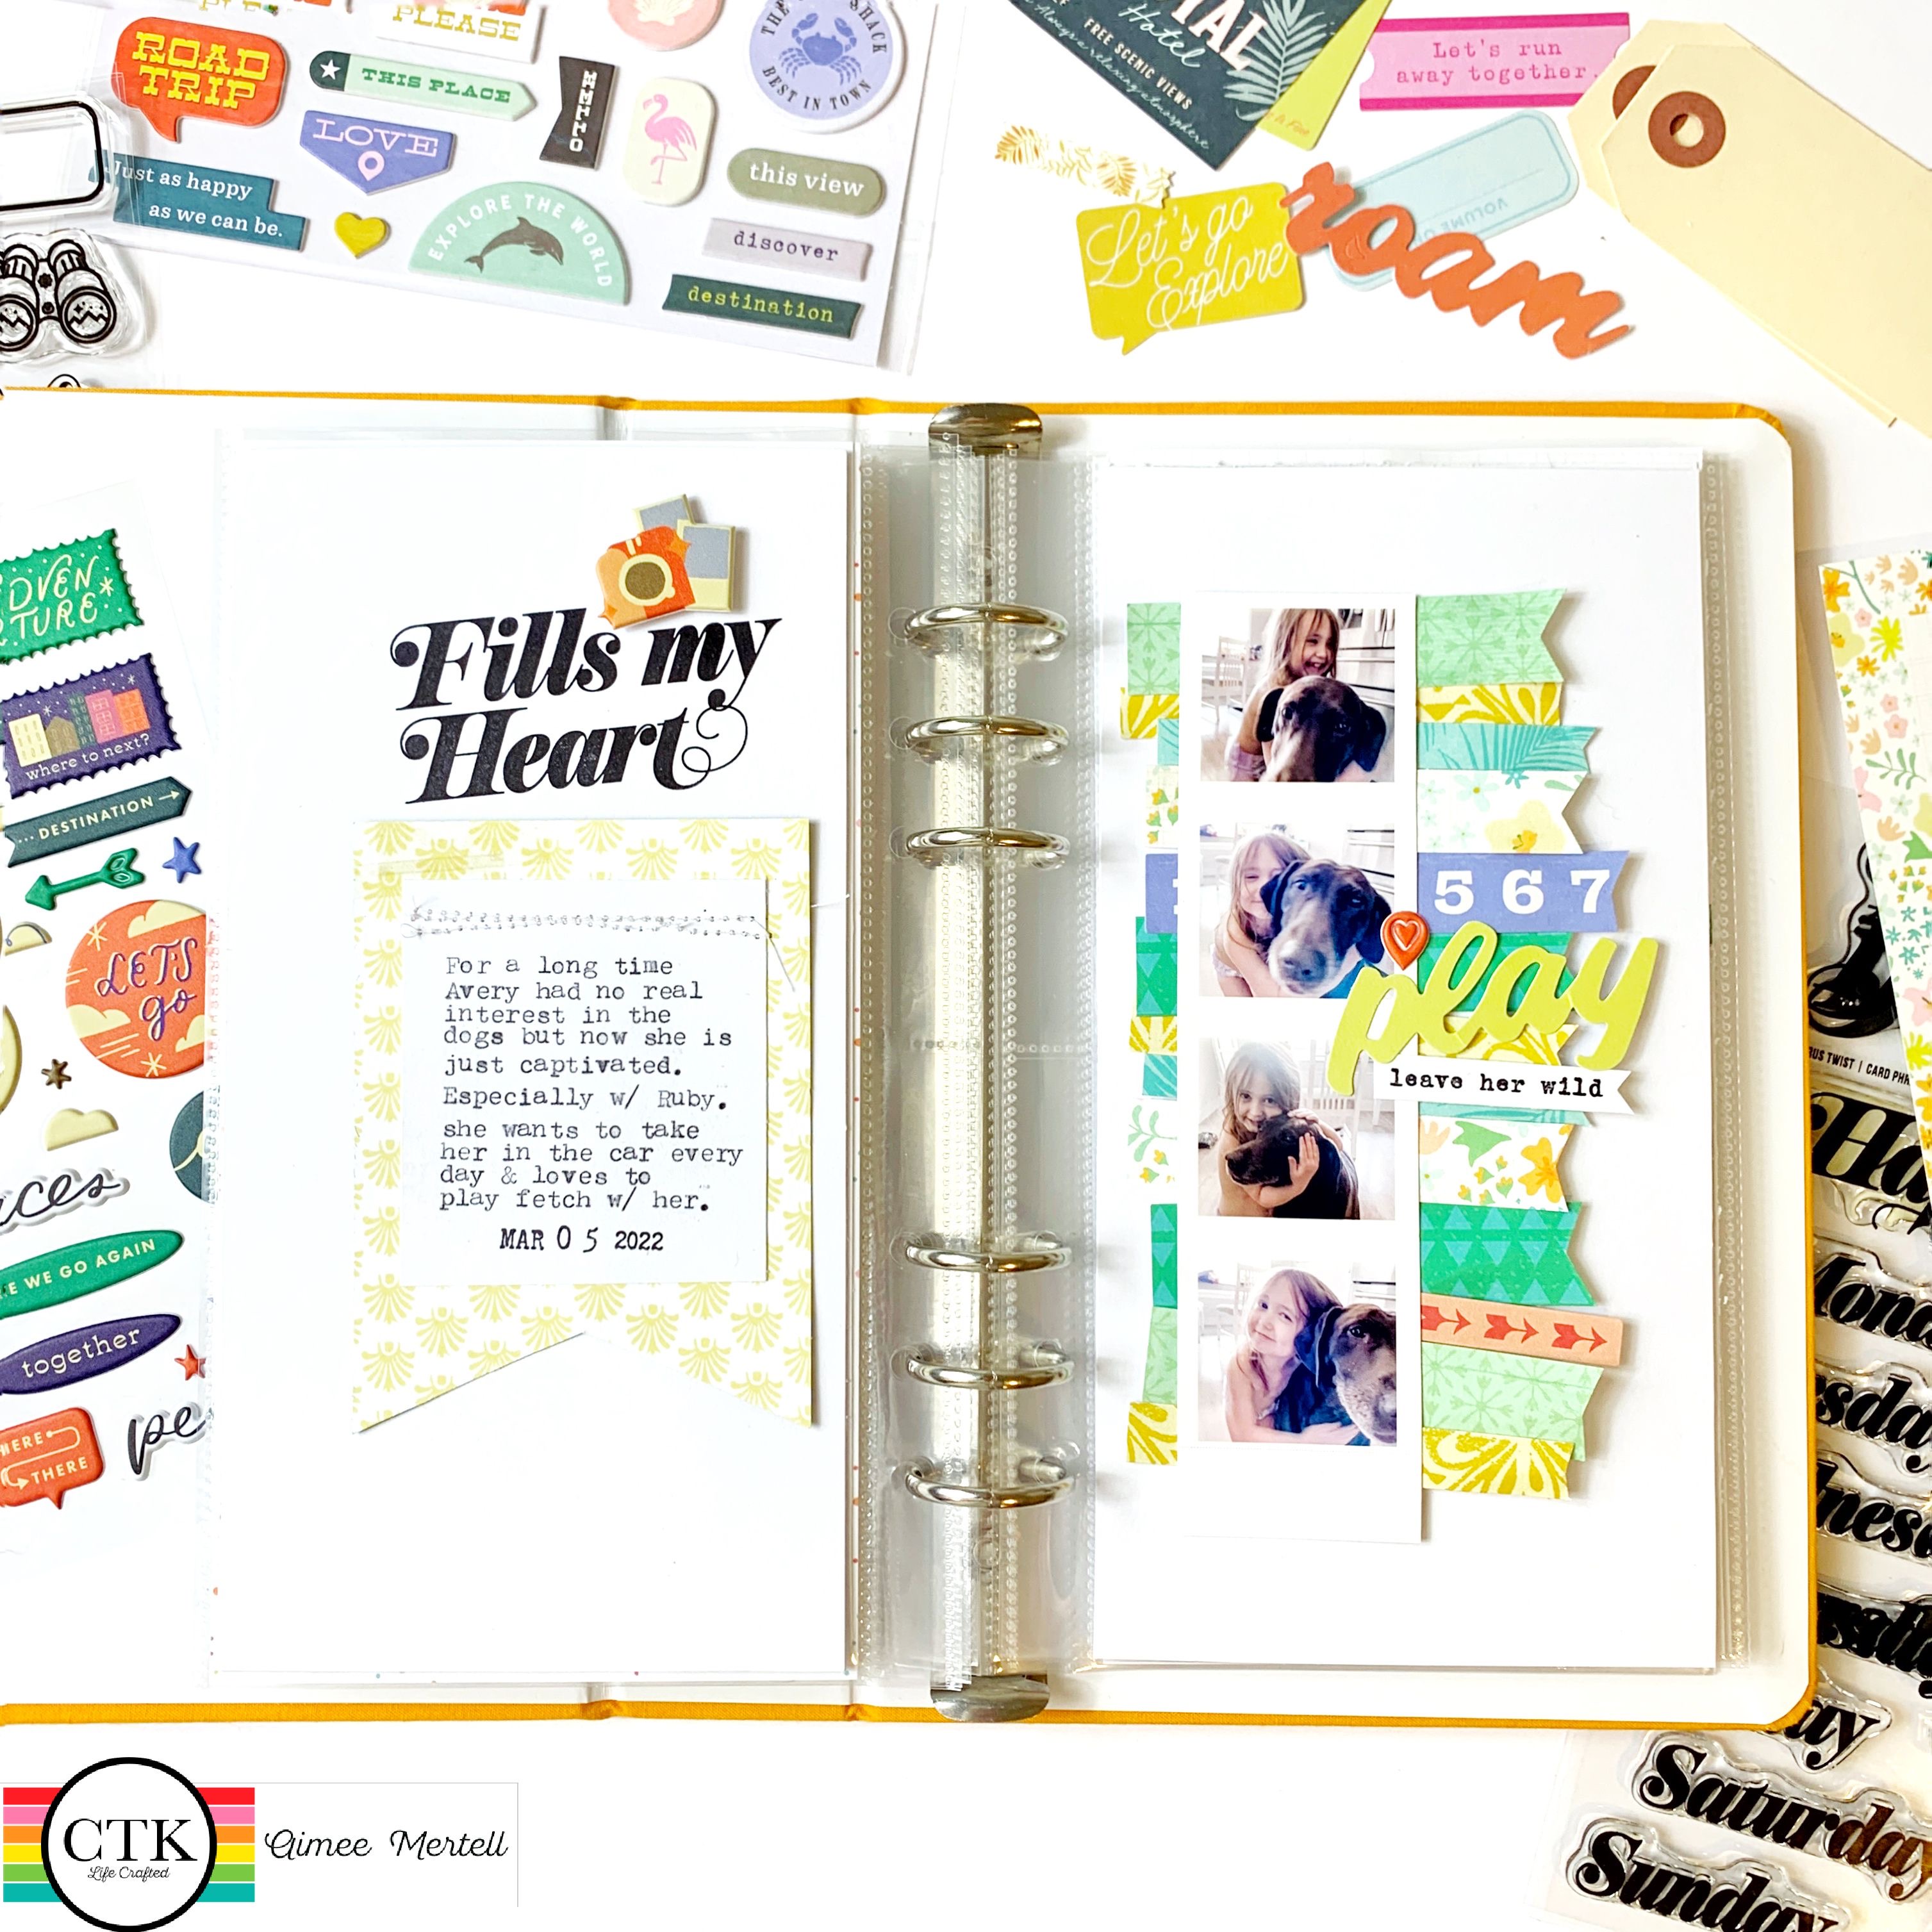
     Hello Citrus Twist friends! It's Aimee here today hosting this week's Sunday Sketch featuring the new Travelogue Kit! First, let's take a look at the sketch we'll be working with: 


Love it! As you can see it's a full page layout sketch but I am going to modify it to fit into my Life Crafted Album. Doing this is relatively easy when you think about the sketch in two parts— the title on one page and the photos and flags on the other like so. 


I love the idea of a photo strip so I snagged these camera roll photos of my daughter and our dog Ruby to do  just that. I selected my favorite patterns from the Travelogue paper stack to make a ton of flags or banners to layer them haphazardly behind my photo strip— really playing along closely with the sketch.


As you can see these photos are not travel related but the Travelogue kit still works beautifully and I love all the bright colors! I grabbed some die cut strips from the Travelogue Die Cut pack to add into my flags as well as this super fun die cut, "play" to layer over the top.


For the, "big title" side of the page I decided to pull a sentiment from the 6 x8 Card Phrases This Day stamp set to use as my title. I think the font is just beautiful and really matched well with the sketch. For my journaling I decided to use a 3x4 card from the Travelougue Kit cut into a banner shape. I think this helped to add a splash of color and balance to this side of the spread and was the perfect addition to my heavy black title. 


I typed up my journaling on white cardstock and machine stitched it right on top of the banner to make it pop. Next, I made my own banner using a sentiment from the 6x8 Travelogue stamp set and added it on top of the photos. Leave her wild! I think this helped to pull some of that black to the right side of the page. 


I finished off by adding some pops of vibrant orangey-red using puffy stickers from the Puffy Sticker sheet and there you have it! This sketch was so much fun and so versatile— you can really make it your own! I hope you've been inspired to give it a try. Catch you next time!


Affectionately, 


Thursday, June 4, 2020

Creating a Flip Up with Shannon


Hello, scrappy friends! Last month, I shared a video tutorial on creating a flip-up on your pocket pages on the Citrus Twist YouTube channel. I know that YouTube videos aren't for everyone so I decided to make a written tutorial this month using the June 2020 CRAVINGS Life Crafted Kit and the scrapbooking add-on. Interactive scrapbooking is quickly becoming one of my go-to tricks when I scrapbook and it's so easy to learn!


Flip-ups can be used for hidden journaling or as a way to add more photos to your page. You'll see that I did both here! Most of the time I hide my journaling because I enjoy decorating my pages and then before I know it I've lost the room for journaling. If you want to give this a try (and you totally should), here are the six easy steps:


Step 1: Cut a piece of cardstock. I like mine to take up most of the width of the top of my card so I cut it 2.5" wide. The length is up to you, but I suggest at least 2" long so you have enough on each side to adhere to the cards/photos well.

Step 2: Fold your cardstock in half. Use a bone folder to make a good crease because you'll want it to stay mostly closed. If you don't have a bone folder you can use the side of a pen or something else that won't leave a marking on your fold.

Step 3: Test out your crease. Make sure it can stay closed pretty well.

Step 4: With your cardstock creased, adhere one side to the back of your top card. This is the card that will be the flap on top of the pocket. Make sure the crease is at the top of the card. You'll want to leave the top of the crease sticking up over the card just a hair. You'll see why in a minute!

Step 5: Open the flap and adhere your hidden photo or journaling to the inside of the flap. This is the card that will actually go into the pocket. When you adhere it, you'll want to make sure it's down just a bit from the crease. If it's too close to the crease then the flap won't stay closed well. You'll also want to make sure the sides are aligned with the flap card on the top. Otherwise, the flap won't cover the pocket completely.

Step 6: With the flap still open, adhere whatever you choose to put on the underside of the card that flips up. In this example, it's where I've placed my journaling. You might also put a photo or a journaling card there. I always adhere it with my flap partially opened so I can make sure the orientation is right when the card is flipped up. Otherwise, you risk upside down journaling! Make sure you're not adhering it right against the crease. You'll want to leave some room for the flap to open and close easily.


You'll notice that I added a little tab on the side of my top card. This is just to indicate that the card can be flipped up. Sometimes I add that, sometimes I don't. It all relates to page design. This journaling card is from the June 2020 CRAVINGS Life Crafted Kit and the "yes" is from the Yes Digital Stamp Set. I used the Digital Journaling Cards so I could add my journaling in Photoshop.

Enough about flip-ups! Let's take a look at the rest of this Life Crafted spread. I love food so I knew when I saw this journaling card with all the words like needing, wanting, craving, etc. that it would be perfect for a spread about some of my current favorite foods (and coffee, of course). That card made the perfect flip-up. Then I used the alphas from the June 2020 Life Crafted kit to write out a phrase on my picture.


On the left side of my spread I did lots of layering. I mixed pieces from the June 2020 CRAVINGS Life Crafted Kit and the scrapbooking add-on. They play so well together! I started with the photo placement and then just kept tucking things behind and on top of it until I was happy with the end result. At the top of the page, I used the physical Yes Stamp Set. I love that the back of these larger stamp sets has tons of ideas for mixing and matching the various stamps! I'm also a sucker for any stamps with ampersands and/or coffee. I kept my stamping in a neutral grey so it would blend with the ink splatters that are already a part of the Digital TN Papers. Plus, the bottom of this page is pretty busy and I didn't want to overwhelm it.


Combining a full size traveler's notebook page with the page protector that holds 2-3x4 cards/photos is one of my favorite ways to use the Life Crafted albums. It allows me some extra creativity on the TN side of the spread and lets me use the wonderful journaling cards that come in the Citrus Twist monthly kits on the pocket side!


I hope I've inspired you to try creating a flip-up on a pocket page. If you do, please share it with us on Instagram or the Citrus Twist Kits Fan Page on Facebook. I can't wait to see what you create!


Sunday, February 16, 2020

Sunday Sketch with Anna


Hi dear CTK friends! Anna here with you today to share this weeks Sunday Sketch. This is my favorite challenge ( I know I say this every time but still true, lol!). I love to kick start my layouts using a sketch, makes everything so much easier. I've been playing with the fabulous February POSSIBILITIES Life Crafted Kit for this page and I stayed very close to the beautiful sketch.Though I cheated with my handwritten journaling using a few beautiful sentiment stamps from two of the February Add on sets, this and this one.


Well, let's have a look at this week's super inspiring sketch.

Ingen fotobeskrivning tillgänglig.


And there you have it! Now it's your turn and don't forget to share with us on CTK Fan Page and /or Instagram @citrustwistkits #citrustwistkits. We can't wait to see what magic you'll create.
Be sure to head over to the CTK shop and grab some goodies or maybe sign up for a subscription, you'll absolutely love it!

Until next time! Anna xo


Friday, January 17, 2020

Googles - Life Crafted with Anna


Hi dear ones! Anna here with my first project using the fabulous January "Fierce & Fabulous" Life Crafted Kit. This kit is jam packed with bright and happy colors, that's right up my alley. Also I've used the gorgeous Add On stamp set This Is Life "Fierce". I just love those frame stamps and words.

Here's what I came up with, hope you'll like it as much as I do!


The word Juli 2019 are stamped by this beautiful alpha stamp set, Italic upper/lower case alphabet & numbers.


And there you have it, all the happy colors! Now it's your turn to play with you lovely stuff and don't forget to share with us on CTK Fan Page and /or Instagram @citrustwistkits #citrustwistkits. We can't wait to see what magic you'll create.
Be sure to head over to the CTK shop and grab some goodies or maybe sign up for a subscription, you'll absolutely love it!

Until next time! Anna xo

Saturday, October 19, 2019

3-to-inspire with Anna


Hi dear CTK friends!

Anna here with you today bringing you this week's 3-to-Inspire challenge. Actually it's one of my favourite challenges. This month's Life Crafted Kit, Here at my table, is amazing as always so easy going. Let's have a look at the prompts I've choosen.

  1. Use your CTK stamps, physical or digital.
  2. Use more than three patterned papers.
  3. Use a b&w photo.

With these prompts (and a few more goodies) my 12x12 layout came up so easily and I had so much fun while creating.
Now it's your turn to dig into your kit's and play along with us in this challenge.

Here's what I came up with, enjoy!


I've used the circle stamp and the coffee mug from this months Add On stamp set, This Is Life "Food Stories Stamp". Then I used a circle punch to cut out my stamped images.


I used not less then five different patterned papers for my page. Three for my circles, one for backing my photo and also one (I used the digital paper and printed it out in A4) for the edges of my background.


And I did edit my photo in b&w. Actually I like b&w pics a lot since then you are not limited to the colors on your photo.


And there you have it!
Hope you have got some inspiration here today! Now it's your turn to dig into you scrappy things and start creating. I can't wait to see what you create using these three prompts. Don't forget to share with us on Instagram @citrustwistkits #citrustwistkits and/or our CTK Fan Page on Facebook.

Until next time! Anna xo