Showing posts with label mini album. Show all posts

Tuesday, December 1, 2020

Sparkle and Joy with Guest Designer, Elizabeth Heinz


Hello friends, it's Elizabeth.  I'm DELIGHTED to share some more pages in my "ABC Christmas" Life Crafted Album.  As a reminder, I'm following a SIMPLE design formula to document some of my family's FAVORITE holiday traditions.  


For the left-hand page, I enlarged a photo to 4" x 8.25" to slip inside the page protector.  To finish, I created an embellishment cluster using a die-cut, chipboard circle and and puffy star sticker.  I chose this chipboard circle because the color AND sentiment complimented the sentiment on the journal card on the opposite page.


For the top right-hand page, I used a stamp from my stash, the red puffy alphabet sticker and my computer to create my title.  To finish, I added another die-cut and puffy sticker.  "Ho ho ho" and the mug of hot chocolate were the PERFECT combination for this story.


For the bottom right-hand page, I chose a 3 x 4 journal card to hold my WORDS.  At the top, I stapled another cute, colorful die-cut.


I hope these pages provided some INSPIRATION.  I'll be back later this month to share more ideas.  HAPPY crafting.  XO, Elizabeth


Thursday, November 5, 2020

Sparkle and Joy with Elizabeth


Hello friends.  I'm EXCITED to share a few pages in my Candy Apple Life Crafted Album.  I'm using the "Sparkle and Joy" Kit to highlight our family traditions in an ABC format.

For the left-hand page, I printed a 4 x 8.25 inch photo to slip inside the page protector.  In the white space, I stapled a die-cut word and added a chipboard star to dot the "i."  In my opinion, EVERY page needs a star.


In the top right-hand pocket, I created my own 3x4 card with white card stock, a stamp from my stash and the FUN, red puffy alpha set.  Next, I went back to the die-cuts.  I chose the ruler to compliment the journal card underneath and the pink striped heart.  To add texture and complete my cluster, I added a thread nest and staple.


For the final pocket, I covered the COLORFUL, ruler journal card with vellum to hold my journaling.  At the top, I used black StazOn ink and the stamp set to create a small title.  


Underneath, I added the "falala" puffy sticker to add a bit of dimension.


I hope this provided some INSPIRATION.  I'll be back soon to SHARE some more pages.  HAPPY crafting.  XO, Elizabeth


Friday, October 9, 2020

Meet Our October 2020 Guest Designer: ASHLEY RODGERS


Hi there!

We are so excited and honored to welcome our October 2020 Guest Designer, ASHLEY RODGERS.   A  few months ago, we discovered Ashley's Instagram account and quickly fell in love with her soft and romantic sense of style.  Her layouts speak of her love of art and love for her craft, that we just had to invite her to work with our FLOURISH kit.  By the end of this post, you are going to love her, too.  So, I let Ashley take it from here....


Hello, everyone! My name is Ashley and I live in Virginia. I’m an artsy-craftsy girl obsessed with vellum and pretty florals, and I enjoy documenting the little things that make life grand.

 Q&A with Ashley

 ·  When did you start scrapbooking? I started scrapbooking special family trips around 2005, but it wasn’t until my grandmother was diagnosed with Alzheimer’s a few years ago that I realized the importance of documenting everyday life and getting my stories told. I discovered Ali Edwards’ pocket page style projects in 2017, and I have been enjoying it ever since.


·  What is something most people would not know about you? Most people would not know that I was born in Germany. My dad was in the Army and we moved to the US when I was still a baby, so it is a dream of mine to visit one day.


·  What are the 3 scrapbooking products you can’t live without? Three scrapbooking supplies that I can’t live without are patterned paper, acetate/transparencies, and my Canon Selphy printer.


·  What do you love about the October- FLOURISH Life Crafted Kit-? I love all of the floral-patterned papers, and the positive sentiments in the stamp set and the tiny word phrase stickers make me smile.


·  Finish this sentence “If you could see my scrapbooking space now . . .”  Everything is nicely tucked away. I have one rolling drawer unit that holds all my scrapbooking supplies and a storage bench that houses all my albums (finished and unfinished). I only keep one project out at a time, and right now this Goldenrod Life Crafted album is giving me all the Fall feels.


----------------------------------------------------------


 Hello! I am so excited to be a guest designer this month! The October Flourish Life Crafted Kit is so perfect for the season I am in right now. My one little word this year is “tend”, and the patterned papers and embellishments in the kit inspired me to create a mini book dedicated to it.
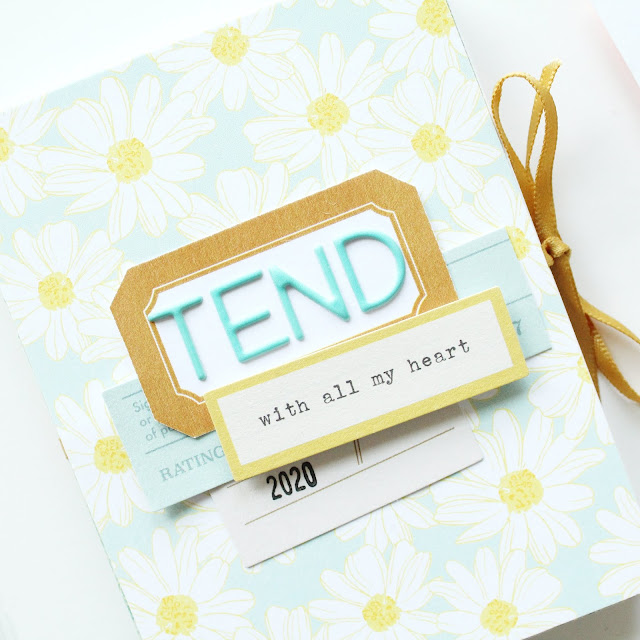


I love this patterned paper so much! It’s super sweet and subtle, so I immediately knew I wanted to use it for the cover. I feel like it sets the tone for the book and its contents – calm and full of grace.

 First, I cut the 6x8 patterned paper down to four 3x4 cards and used one for the cover. Then, I layered a few die-cuts with a little foam tape to add some dimension. The blue-green puffy alphabet stickers add the perfect pop of color for the title.


 I decided to document five things I’m learning from my word this year, and the 3x4 cards in the kit provided ample space for all my journaling. On the right, I used one of the journal cards and made sure to number it with a puffy sticker. I like to keep things simple with minimal embellishing.


 On the second page I added a 3x4 photo of some flowers around the house, and I used another journaling card on the right. When I begin a project, I always start with my photos, so I chose cards from the kit that I knew would coordinate well.


 I used a die-cut from the ephemera pack to number the page in the top right corner, and I used one of the word phrase stickers to emphasize my journaling above it.


On the next page, I had a little fun with the October 2020 This is Life “Ready for This” stamp set and created my own journal card. The repeated stamping technique is simple but effective, and I embellished it with a die-cut number three. On the right, I used another journal card accented with a tiny word sticker.


Here, I used a journal card on the left side of the page and added my photo on the right. I wanted the photos to be a resting place for the eye, so I let them be without any embellishing. I like how the puffy number sticker stands out on the page, but isn’t too distracting.


This mini came together fairly quickly because I repeated the same formula for each page. I love the color story and the cohesion.


On the last page I made another journal card using the tiny heart stamp from the 4x6 This is Life “Ready for This” stamp set, and I added the Flourish Life Crafted kit quote card on top as a final touch.

 I love making mini books, and this one is especially dear to my heart. I hope you are inspired to create your own now. Stay well!


-----------------------------------------------------


We are in love with this mini Ashley has created with the Flourish Kit.  Make sure you leave her some love and check her creations in her Instagram account: https://www.instagram.com/sweetashleyann/

Ashley will be back with a few more projects throughout the next few weeks.  WE cannot wait to see what she creates next.  Thank you, Ashley!


Saturday, May 9, 2020

3 to Inspire with Kira

Hey there!  It's Kira and I am here with a 3 to Inspire challenge!  It's been a bit since I've participated in one, so I was really excited to bring you guys some fun prompts!  Here's my prompts for the week:

1.  Make it mini!

2.  Fussy cut

3.  Use stitching

And here's a look at my project:


Obviously I went as mini as possible with my project, but I challenge you to interpret the prompt however you want.  Maybe you normally scrap 12x12 and want to try a TN layout?  Or you could use a small 2x2 photo instead of a 3x4 photo.  I can't wait to see how you change it up to suit you! 


I started my project with this little wood sleeve that is an upcycled seed container from Target.  I used the May Add-On kit to embellish the front with patterned paper and foam thickers.  Inside the container is an accordion folded mini album.  I trimmed a piece of patterned paper down to 10x3.5 and scored it every 2.5".


To add some texture and interest to the cover, I stitched around the edges.  In hind sight, I should've used my stitching to add my pockets! (I used adhesive for my pockets, so learn from my mistakes! Ha!)


I embellished the inside of the mini album with lots of fussy cut flowers, postcards and paper airplanes.  I also added some more foam thickers, puffy stickers and and enamel dots (all found in the Add-On kit!).


I can't wait to see your interpretation of the prompts!  Thanks for stopping by!

xo, Kira

Wednesday, October 9, 2019

My FAVORITE things with Elizabeth


Hello friends.  I LOVE Christmas.  The reason for the season; family traditions; decorations; twinkle lights; gatherings; music; giving and MUCH, MUCH more.

When Trina asked me if I'd like to work with the Christmas Daily Kit, my response was, "ABSOLUTELY."  My mind began IMMEDIATELY swirling.  I kept thinking of the song from the Sound of Music.  "These are a few of my FAVORITE things."  That's IT.


I lost my dad 5 years ago.  He also LOVED Christmas.  As many of you know, when you lose someone, your PERSPECTIVE changes.  I became MORE sentimental.  Childhood ornaments that I used to hide at the back of the tree were NOW given PRIME real estate.  In this album, I will use WORDS and PHOTOS to share some of the things that are SPECIAL to me.

Today, I'd like to share the beginning of my album, including the inside cover AND reason why.


For my inside cover, I created a BASIC template of a house.  After cutting apart the puffy stickers, I began placing die-cuts and stickers INSIDE the house.  I usually start LARGE then progress SMALLER and SMALLER.


When I was HAPPY with my template, I drew a LIGHT pencil outline and started moving pieces into my album.  I used a scallop punch to create my roof, and added a window and door to BUILD my home.  I also used foam tape to add dimension to the die-cuts.


I'm a bit OBSESSED with tags.  MOST of my albums include tags of ALL shapes and sizes.  To open my album, I cut a tag out of kraft card stock.  I found a few stamps in my stash to create a subtle musical note background.  After, I created a title using a combination of script and the FUN, striped puffy stickers in the kit.  I finished with ribbon and a few stickers and die-cuts.


On the back of the tag, I cut and adhered some of the VINTAGE paper from the kit.  I used foam tape to add a couple of stickers for color and interest.


Next, I used one of the 3x8 journal cards to write my "reason why."  I shared a lot about my dad.  To me, WORDS mean much.


On the back, I included a 3x8 photo of the nativity from my childhood.  To embellish, I attached a die-cut and a couple of stamp phrases.


Stay tuned.  Next month, I'll share my foundation pages.  For me, a SIMPLE design formula = SUCCESS.


Monday, August 19, 2019

Chasing Rainbows Summer 3x4 Mini Album


I'm a summer girl through and through, and I'm thankful that I have at least a few more weeks, before it really starts to cool off.  Till then I get fill up some albums and this cute little book with memories I made with my little family this summer.  I've been crushing so hard all the summery colors in the past couple kits.

I really wanted a cute little album to string together, with a few photos that I adored from this summer.  I even let my little one help me string up each page together in a cross pattern.

I first began by picking out the patterned papers from the kit that I liked and a few 3x4 coordinating cards as well.  After I decided what order they would all go in, I folded it in half, then punched four holes along the folded edge.  We strung up the pages with yellow ribbon, along the spine and tied it off with a pretty yellow bow.

I sifted through all the goodies that came in the "Chasing Rainbows" kit, and I chose a few coordinating embellishments.  They were the perfect addition to my photos.  Most of my photos I chose to fit a 2 1/2" or less space within my book.  After arranging my photos I nestled in my chosen embellishment, added some scraps for dimension, and stitched on all the pretties.

I really love how this cute little mini album turned out, and it was so much fun to create!  I hope if you find yourself with a few hours to yourself, that you'll use this cute little mini as inspiration to memory keep some of your memories too!