Showing posts with label printables. Show all posts

Saturday, February 2, 2019

3 to Inspire with Nathalie


Hi there!

Nathalie with you today with this month's first 3-to-Inspire.  I hope you all have visited the store to see what Trina has put together for this month's Life Crafted - LOVE STORIES - kit, Add on kit and stamps.  I am always awed at the beautiful kits, and this month it does not disappoint.  So to give you a taste of this month's kits, i created two projects following this week's prompts:
  1. Use a Repetitive Shape
  2. Use a Black and White picture
  3. Go Monochrome &/or Same color family

Let me show you how i interpreted the prompts in  my Life Crafted album using the  Love Stories Kit and the Diamond Heart cut file (available for free to all subscribers)


For this page, i decided to play with tones of pink to document a recurring moment in our lives with teens.  First i picked one of the papers from the kit to serve as the background, and use another one of the papers to mat and layer the picture.


This month's Love Stories kit is packed with embellishments, so i pulled a few hearts from the acetate shapes and the puffy sticker sheet to complement the die cut that forms  my title.


To add the journal of the picture, i used my typewriter on the tag that comes included in the kit.  While i typed the story, i set my Cameo to cut the Diamond Heart cut file from the same paper that mats the picture and twice from pink cardstock.   These were glued together to create the dimension on the die cut.


To complete the repetitive prompt of the challenge, i pulled a few more hearts from the Love Stories kit to accent a few of the clusters in around the layout.


How easy and fun is that layout, now let me show you a second project using the prompts, the Add-On kit, Love Stories kit, and the Add-on stamp.


I wanted to create a Valentine's Day page that was masculine and not  the usual pink or red, so i chose the cool tones of the papers of the Add-On kit to create this page.  Love all the papers and embellishments in the kit!


First i added a bit of Pinkfresh Studio watercolor to the background so that they match the colors of the papers.  While the background dried,  i backed the spaces of the Diamond Heart cut file with papers from the add on kit. 


These triangles were the inspiration for my repetitive shape, those small enamel triangles (Dear Lizzy's New Day collection ) came in handy to contimue my repetition of shapes.


Since i wanted the background and picture to be highlighted, I chose to convert the picture of my husband and smiling baby dog to black and white.


 I used papers from the Add-on kit as well as ephemera pieces, cut apart elements (free printable page available for subscribers) and a few pieces from the Love Stories kit to frame the picture. Here is a video that will show you how this page came together:


I love how these two projects turned out by following this week 3-to-Inspire prompts and this month's LOVE STORIES, Add-on Kits and Stamps... Now it is your turn to create a project inspired by these prompts.  Remember to share your creations with us on our Citrus Twist Kits Friends page on Facebook or on social media by tagging @citrustwistkits or #citrustwistkits.  We love to see your works.

If you have any questions, you can always contact me.
Have a great weekend!

XO


Monday, January 21, 2019

Let's Get Digital with Amanda!


Hi CTK Friends! 

I hope you're loving all the fabulous inspiration with the new Life Crafted Kit!
I am SO excited by this new fresh look for memory keeping, but I am also very much a 12 x 12 scrapbooker by heart! So even though this month's Digital Cut Files are perfectly created for your Life Crafted album - I've edited the size of the Retro Circle Border digital file for today's post and created this.....

"Good Vibes Only"


Oh wow!!!
You can see that Life Crafted is very much for the 12 x 12 scrappers too! 

CTK Supplies: Life Crafted January 2019 Kit - Fresh Starts, Scrapbook Add On Kit, January 2019 This Is Life "New Beginnings" Stamp, Subscriber Exclusive Digital Cut File - Retro Circle Border, Subscriber Exclusive 2019 January Printable.  

Other Supplies: Shimmerz Paints: Vibez - Jeni Be Bleu, Hermit the Frog, & Deep Blue Sea, Umbrella Crafts Premium Dye Ink - Green, Versa Ink - Lime, & Bakers Twine. 

TIP: 
To download any of the CTK Subscriber Exclusive Digitals or Printables, you must be signed into your account, before selecting the Subscriber Workshop tab. Once you've done this, scroll down the page and click the item you wish to download. 

To create this amazing layout I start by enlarging the digital file, and replicating it. This is so I have two sets of circles to work with. Before I remove the Retro Circles Borders from my cutting mat, I treat them with a few sprays of Shimmerz Vibez - as shown below.....


Lots of messy fun here! 
You'll notice that I have washi tape on the sides of my cardstock, the purpose is two fold. 
1. My mat isn't quite as sticky as I'd like it to be, so the washi tape aids to keep my cardstock in position and, 
2. It also aids against paper warping when I add all that paint. 
Once dry, I remove the Retro Circles Borders cuts, as well as the negatives. Be sure to keep the negatives, as I use quite a few of these left over circles on the left hand side of my layout.


I use pretty pattern papers from both kits to trim the top and base of my layout. Next, I glue 95% of one Retro Circle Border to my page, trimming away the excess along the right hand side of my layout. Using the gorgeous leaves stamps included in the "This Is Life" New Beginnings Stamp, I add lots of lime and green foliage to the layout base. Those stamped leaves are really something! Such beautiful details! 


Next, I glue down the left over 'negative cuts' from the Retro Circles Borders, and foam mount the odd one or two. I just love how effective this looks! With circles as a dominant shape in my design, it seemed a no brainer to use the circular frame from the Dear Lizzy Die Cut Shapes (included in the Scrapbook Add On Kit) for my sweet girl's photo. I also needed an accent color - something with a lil warmth to balance and cut through all those cool greens and blues. The answer was that fabulous golden Hello Love chipboard sticker. This is from the CTK exclusives included in the Life Crafted - Fresh Starts Kit. And even better, it's a circle too! Love it! 


I fussy cut a few of the Dear Lizzy Die Cut Shapes so that they better suit my design. In particular, the Good Vibes Only title piece. I have snipped away the cacti so it now mimics my stamping and flatters my photo! For finishing touches, I also add that pretty green tag from the Subscriber Exclusives for January and the Tiny Word Stickers from the Life Crafted Kit. 


Simple. Beautiful. Life Crafted! 

I hope my layout has inspired you today! 
Life Crafted is all about you and your stories - so craft it your way! 
I can't wait to see what you create! 
Be sure to share your projects with these beautiful kits & Subscriber Exclusive Digitals & Printables in the Citrus Twist Kits Facebook Fan Page HERE! 

Thanks so much for visiting today! 
Til next time, 

Thursday, January 18, 2018

Make Your Own Printables with Chantal

Colour is my jam and like many, I have a load of things pinned on my Pinterest board (colour combos and wonderful graphics). Once in a while, I'll get inspired and I'll create something of my own in Photoshop, for my projects. Digital printables are a quick and easy way to add a little "oomph" to any layout and keeping it simple is best. If you have a cutting machine like me, you can create custom flags and tags but if you prefer to stick to your manual punches, circle printables in 1in, 2.5in and 3in, are THE best!

First off;

1- choose a great font (e.g., something that can still be clearly read when sized at 15 pt)
2- pick out a colour palette
3- find a few simple words and/or sayings

Font Guideline Tips

Remember, if you're mix and matching your fonts; opposites attract. Like serif & sans serif, fat & skinny and uppercase & lowercase. An example of great font combinations are Lora & Source Sans Pro and Futura & Georgia Italic.

The below project was created with some of this month's Sugarland goodies and a few basic printables that I designed in Photoshop, especially for this layout.


As a special thank you, here's a link to a few Sugarland coordinating printables. Enjoy!

Happy creating!


Wednesday, January 18, 2017

Let's get digital - hello 2017!

Welcome everyone!
It's Mira and Andrea here and in today's post we'd like to invite You to join Citrus Twist Kits Facebook Fan Page (if You still didn't) and search this amazing place for a few freebie files that You can use in Your projects!

We prepared two cutting files and a lot of printables (You will find them later in the post)  for You and created some inspirations to show You how they can be used! So! Let's begin with cutting files from Mira:


What I made with one of the files is a simple, no-picture layout that is opening my Pocket Life Album saying which year this is:


In January Pocket Life Kit I found a few CTK exclusive papers that were perfect for the opening page of my album - they are bright, intensive and strong and really motivating. I thought they could bring me the positive energy whenever I'd open the album. 


I really love that delicate flower pattern on the other paper included in the kit, so I used it to add a little subtle effect to the page. 


All those exclusive products from this month's PL kit are happily screaming: "Happy New Year! Happy New Year!" so I picked some of them, mixed with embellishments from Embellishment kit, added some final touches with my sewing machine and black ink splatters, and in one moment I created a very nice title page for 2017!


And hello again, from me, Andrea! I've partnered with Mira today as part of the “Let's Get Digital” scrappy fun, to bring you fun free printables to use for the new year too! You can get the printables on the Citrus Twist Kits Facebook FanPage, the same place where you can get Mira's beautiful cutfiles.

I created a two page spread using the printable I designed and the amazing January kits – the main kit, “Jameson”, and the “Oh Darling” add on kit, plus a couple of things from the Sprinkles kit and the Embellishment kit. The kits this month are so beautiful filled with such beautiful and bold colors that really inspired me and made me feel bold and confident with this new year that we have just begun! I am starting my project life album for 2017 and so these will be the first couple of pages in my 8 ½ x 11 album.


For my printables, I created two fun pieces that can each be used in different ways, according to what suits your needs. You may choose to print on photo paper, cardstock or vellum or a combination (as I did). And the printables come in a few different sizes (8 ½ x11 6x8 and 3x4 ) so if you are doing pocket pages you may print the printable as a card as well. Do whatever works for you! In my case, I like to do a mix of layouts and pocket pages in my PL albums and I decided that I would begin my album with a big bold statement cover page! I combined the pink polka dot printable (which I printed out on semi-gloss photo paper) and the black and white printable (which I printed out on vellum) and sewed them together to make a statement piece for the beginning of my album.


For the layout that I did to also start out my new album for the new year, I chose to also go big and bold with the use of a large picture. I chose a pic of myself that reflected my thoughts on this new year, what I hope will be one filled with great possibilities and a bright future on the horizon!


I used the bright bold colors and patterns in the kit like the pretty multi-colored striped Crate Paper patterned paper from the add on kit and the beautiful blue exclusive paper from Citrus Twist in the Main kit. I chose embellishments that I thought fit the “new year, new adventure” theme of my spread and indeed my album for this year. I love the wood piece in the kit that says “hello 2017” on it, the 2017 stamp, and the pieces from the exclusive ephemera pack that say things like “be bold” and “live your best”!


I hope you enjoy the printables and that I have inspired you on how they can be used along with the January kits to make a fun new start to your memory keeping this year! Please share what you create on the Citrus Twist Facebook Page...I would love to see all your creative ideas for how to use the printables! Hope you enjoy the all the 2017 freebies from today's “Let's Get Digital” with me, Andrea, and Mira...we so enjoyed making these goodies for you and we can't wait to see what you do!


Happy Scrapping! – Andrea & Mira

Tuesday, August 18, 2015

Tuesday tutorial with Janine

Hello everyone, it's Janine today. I'd love to invite you to join the following tutorial where I am going to print and cut some printables with my Silhouette.

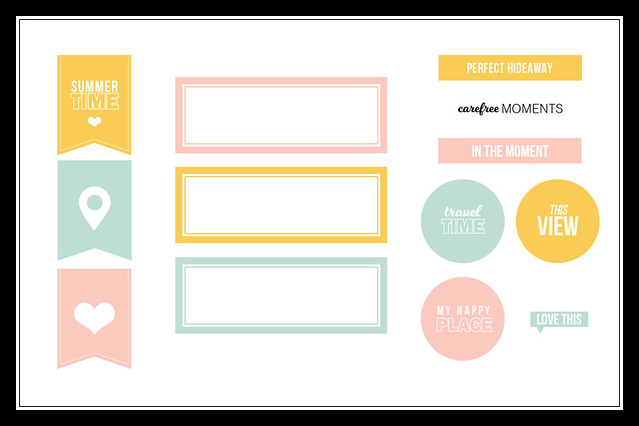
printables-janinelanger-ctkaugust2015-preview

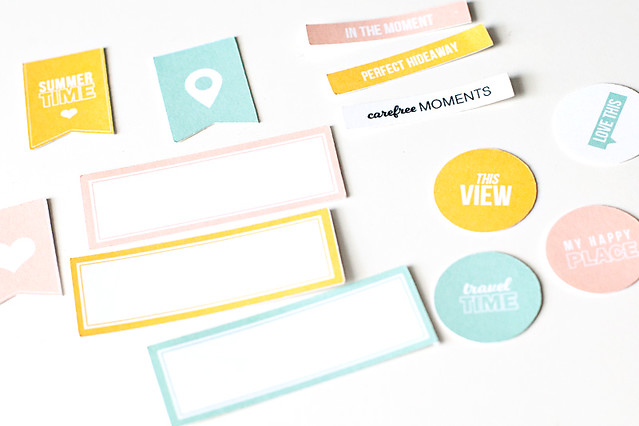
I created some printables that I used on a layout that I am going to share later. If you'd like to download them, you can of course use them, too! All you got to do is join our Citrus Twist Fan Page on Facebook and download the files.

But now on to the printing and cutting part. Of course you can also print and cut them by hand, but I have to admit that I am lazy when it comes to this. So I love the fact that it is possible to print and cut the files with the Silhouette!

I do have a Silhouette Portrait, but it works the same way with the 12x12 Silhouette. Also my Silhouette Studio program is in German, but I am going to do my best to translate everything for you.

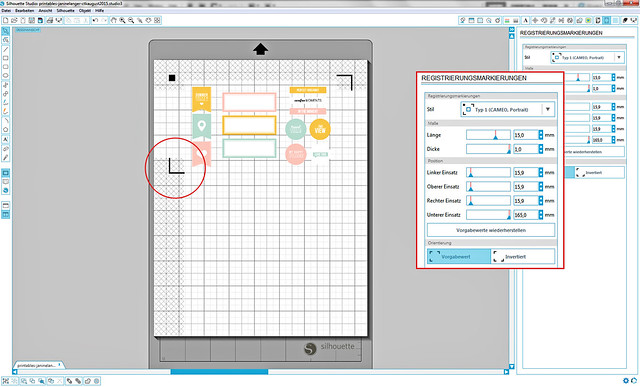
janinelanger-ctk-august2015-tutorial-002

First you open your file. It is very important, that you don't move it around, just keep it as it is. If you do move it around and don't costumize the print file later, then the cut won't be perfect. Anyway, you open your file with the printables and go to your registration mark settings, as shown in the picture above. I don't like to waste paper and I don't want to print and cut a full sheet, so I customize the sliders as shown. In this case I've been looking for the bottom mark to be more on top, so I can cut off the sheet later and use what's left for another project.

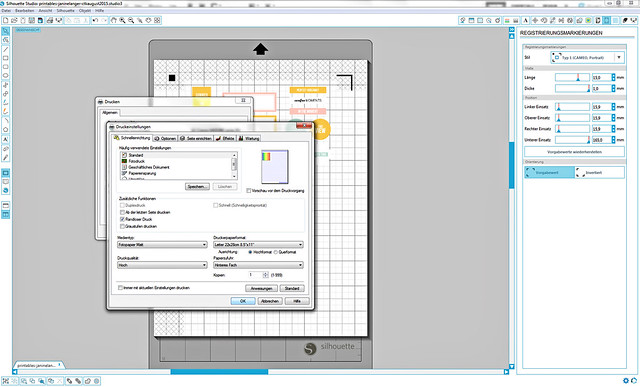
janinelanger-ctk-august2015-tutorial-003

Then you print the sheet with the registration marks on it. Don't forget to  customize the settings for your printer first.

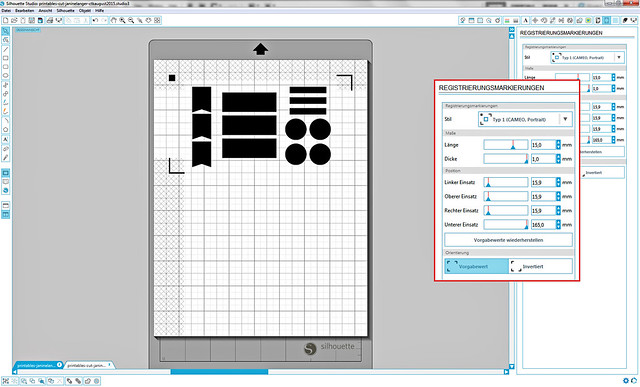
janinelanger-ctk-august2015-tutorial-004

Now you open the cut file, that you can download at the Citrus Twist Fan Page, too. You want to set the registration marks the same way you did on your print file.

janinelanger-ctk-august2015-tutorial-005

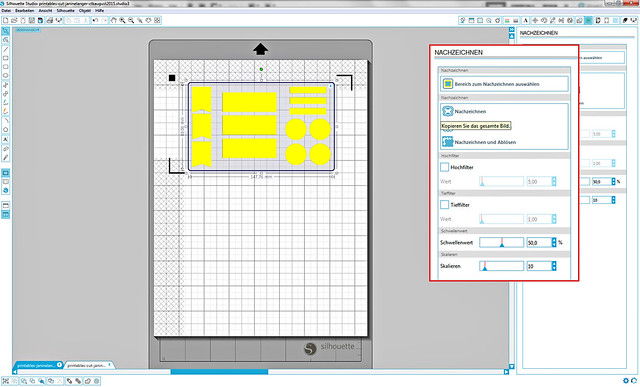
Then you prepare your cut file for the cutting part. You open the trace settings, cklick on select trace area and select the cut files. You unmark the high pass filter and adjust the settings of the threshold settings to your liking. I like to keep it aroud 50, in my experience the cut is better then.
The next step is optional, but I personally like to delete the original cut file and just keep the traced red lines.

janinelanger-ctk-august2015-tutorial-006

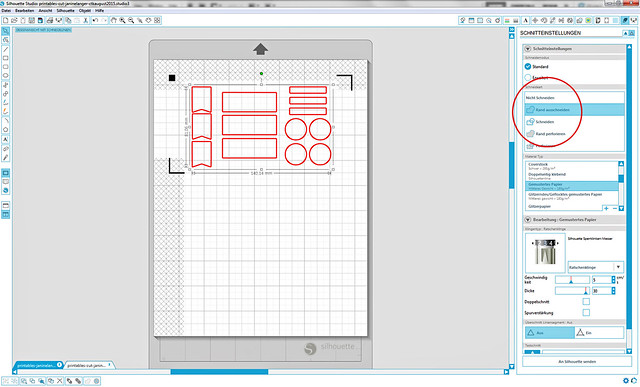
Then mark the red cutting lines you created with a mouse click and go to your Silhouette cut settings. It is important that you click on cut edge and then of course adjust the other settings, depending on what paper you use.

If everything looks ok and has a red line showing where to cut, go ahead, line your paper up on your cutting mat and load it into your Silhouette. Then everything is ready to cut, just see the magic happen.

One last hint, try to have the lights on or good daylight, when you cut with registration marks, so the Silhouette can read them properly.

janinelanger-ctk-august2015-001c-tutorial

There are some other ways to do this with one file only, but from my experience this way you get the best cut. :)

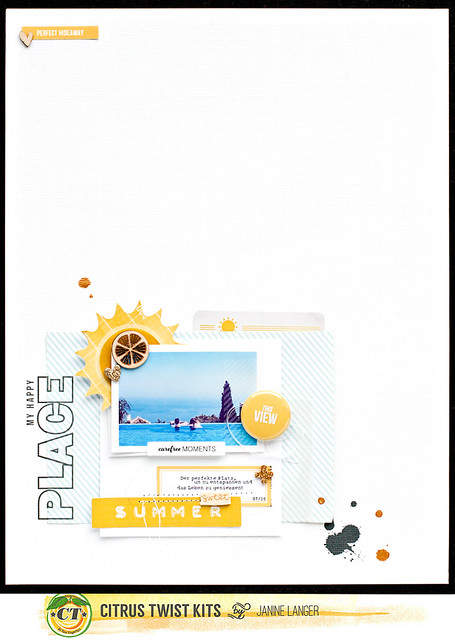
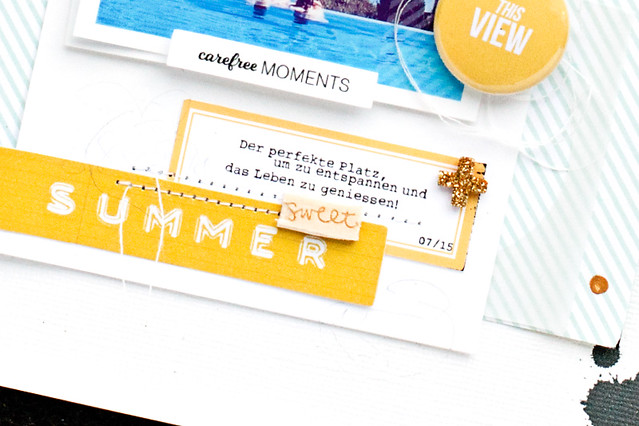
And here is the layout that I created, using some of the printables and supplies from various Citrus Twist Kits from the past. I also made a button with my button machine out of one of the circle printables.

janinelanger-ctk-august2015-001-tutorial-banner

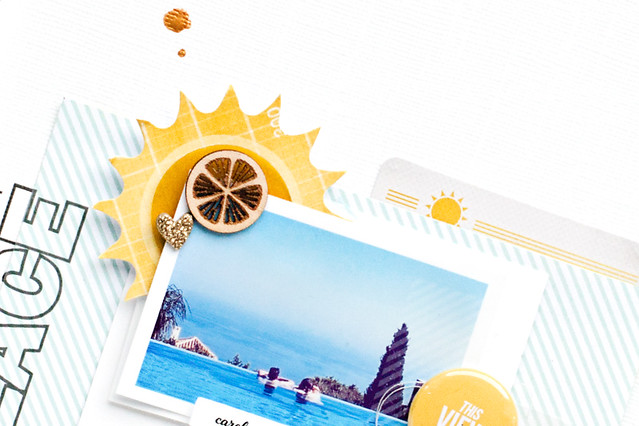
For this layout I used a photo that I took when we were in Spain this summer. It was so hot, that the pool was our best friend! The view we had from the pool was amazing, so relaxing.

janinelanger-ctk-august2015-001a-tutorial

janinelanger-ctk-august2015-001b-tutorial

That's it for today, thanks so much for joining me.

And if you like the printables, don't forget to download the files. I really can't wait to see what you are going to do with them!