Showing posts with label Marci Villanueva. Show all posts

Sunday, December 17, 2023

Sunday Sketch with Marci


Hello, thank you for joining me this Sunday for our Sketch challenge.  It is a very fun and creative one. 

Here is the sketch we will be using. I loved the evergreen trees on this page. My original plan was to follow the sketch almost exactly. After making my trees, I liked them so much I did not want to cover them up. I therefore adjusted the sketch slightly. 


Here is my final layout. I made the main page 7in wide by 8.25in tall to fit in my December Album this year. To include a longer story and more embellishing, I added two 3x4 journaling cards to the left side of the layout. 


I used two Citrus Twist exclusive cut files for my trees.  All the papers, cards, and embellishments came from the OH WHAT FUN! kit. I think the black and white color palette with a pop of red is such an elegant look. I made sure to pull a bit of red into each area of the spread.


I used a white, glitter texture paste from my stash to paint the center tree. Similar to the sketch, I wanted it to have a snow-flocked look.  I then used a red marker to color in the stars on the cut file. It was a simple step that I think adds a lot to the design. 

Here are a few more close-up looks. 


Thank you for stopping by. I'd love to see what you create with this sketch. 


Sunday, October 15, 2023

SUNDAY SKETCH with MARCI


Hello, Citrus Twist Fans! Welcome to the Sunday Sketch post. It is Marci with you today. 

I'm using the Halloween collection, Mischief & Mayhem, along with this sketch. 


When I first looked at the sketch, I loved the linear square grid. I followed the sketch fairly closely this week. I did scale it to fit in a 6x8 album. I think it worked out great. 


I knew I wanted this page to be a stand-alone page vs. inside a page protector. That meant my dimensions needed to be 7in wide by 8.25in tall. The papers in the kit are only 6 in wide. To accommodate my needs, I cut a 1-inch strip of black cobweb paper and adhered it to the orange paper with washi tape. This gave me added width and a place to punch my holes. 


To ensure the black strip coordinates with the whole spread, I used the remainder of the cobweb paper to make four mats like in the sketch. 


I had a ton of fun using the Mischief and Mayhem ephemera pack to decorate my blocks. This one with the various witches' paraphernalia is my favorite! 


In the sketch, there are two squares that have word strips hanging off the edges. I first tried the labels in the kit but they were too big. Then I noticed on the 6 x 8 mischief mayhem stamp set there was a small label stamp that said "date". I didn't need the word "date" so after stamping in a coordinating orange color, I cut off the end portion to just have a blank label. I then used several of the fun Halloween sentiments to fill in my labels. 


Lastly, I used the white alphabet puffy stickers to make my title. To mimic the side embellishing on the sketch, I added some die cuts as well as some stamped images from the stamp set. I adore how this page turned out. 

I hope you are inspired to use this sketch and make something fab-BOO-lous this Sunday!

Marci


Sunday, June 11, 2023


Hello Friends! Marci is here with you today.  I am very happy to share the Sunday sketch with you. Here is what we will be working with this weekend. 


The first thing I saw when I looked at this sketch was a pocket. I had the initial idea to make a large circular pocket on my layout and add tags with pictures and journaling inside. That is pretty much what I did. My final spread follows the sketch fairly close. 


My finished project is 8.5in x 11in in size. The first step I did was to print off a few of the digital paper from the LIFE IN MOTION Digital paper collection. I made a few adjustments to the papers in photoshop elements. I needed to resize the coral paper larger. I also changed the background color of the flower paper from blue to black to match my photos. That is the beauty of digital files. You can print them as is or adjust them as needed. 


Next I cut out two 7in circles and sewed them together on my sewing machine for added design and texture.  The next step was to add a title and embellish the page. I choose these two alphas sets from the shop, rose gold alphabet puffy stickers and sadie black alphabet puffy stickers. I like having the contrasting colors and fonts to bring more interest to my title.  The floral embellishments came from the Slow Days Die Cut Ephemera pack released a few months ago. Even though the florals came from another collection, the colors match the LIFE IN MOTION release perfectly! 


The final step was to work on my tags. I used plan white card stock to make three tags. Two are approxiametly 3in x 4in and the other tag is approxiametly 4in x 6in in size. I printed my favorite picture for the largest tag. I then added supporting pictures to the other tag. Using one of the digital LIFE IN MOTION journal cards (which I adjusted in photoshop elements to combine the exact sentiment with the color I wanted) I typed up my journaling. 

This was an extremely fun page to put together. I hope the sketch inspires you to make a project this Sunday. Remember, you can follow the sketch exactly or change it up anyway you like. I'd love to see what you create. 


Saturday, April 1, 2023

3-to-Inspire with Marci


Hello CTK friends! It is Marci here. It is the first of the month which means there is a new release in the shop. I am very excited to bring you the first 3-to-Inspire with the new Travelogue collection! 


Here are the 3-to-Inspire prompts for this week:

  1. Tone on tone embellishing
  2. Use a tag 
  3. Incorporate something “older” from your stash


I was drawn to the digital paper number 9. It reminded me of a map and the stitch marks across the green portion looked like lines on a road. I wanted to take this picture of my son and his friend driving an electric toy vehicle and make it look like they were driving on the road. Digital paper number 10 with the black circles made me think of tire tracks so I used that to mount my picture. 


To embellish the page, I got the idea to add tone on tone pieces to the three color portions of the paper. I used several die cuts from the Travelogue ephemera pack. I needed more pieces to fill in the spaces so I turned to the 2022 Travelogue chipboard stickers and some older enamel dots. Now I had enough pieces in the matching colors to make my design. These are my “older” items for the challenge. (I am using older in quotes because we all have stashes with different ages. Some of our older items might be a month older while other items are 10 years old! Go with what you have available to you.)


This month’s kit comes with a large Kraft shipping tag. I liked the idea of using it as the second page to my spread but the color didn’t work. I used the shipping tag as a template and cut my own out of one of the other digital papers. Now my tag coordinates with one of the colors from the left side of my spread. I added my title, journaling and more embellishments to the tag to finish out my spread. 


I hope you find the 3 prompts this week inspiring and give them a try. 


Sunday, February 12, 2023

SUNDAY SKETCH with Marci


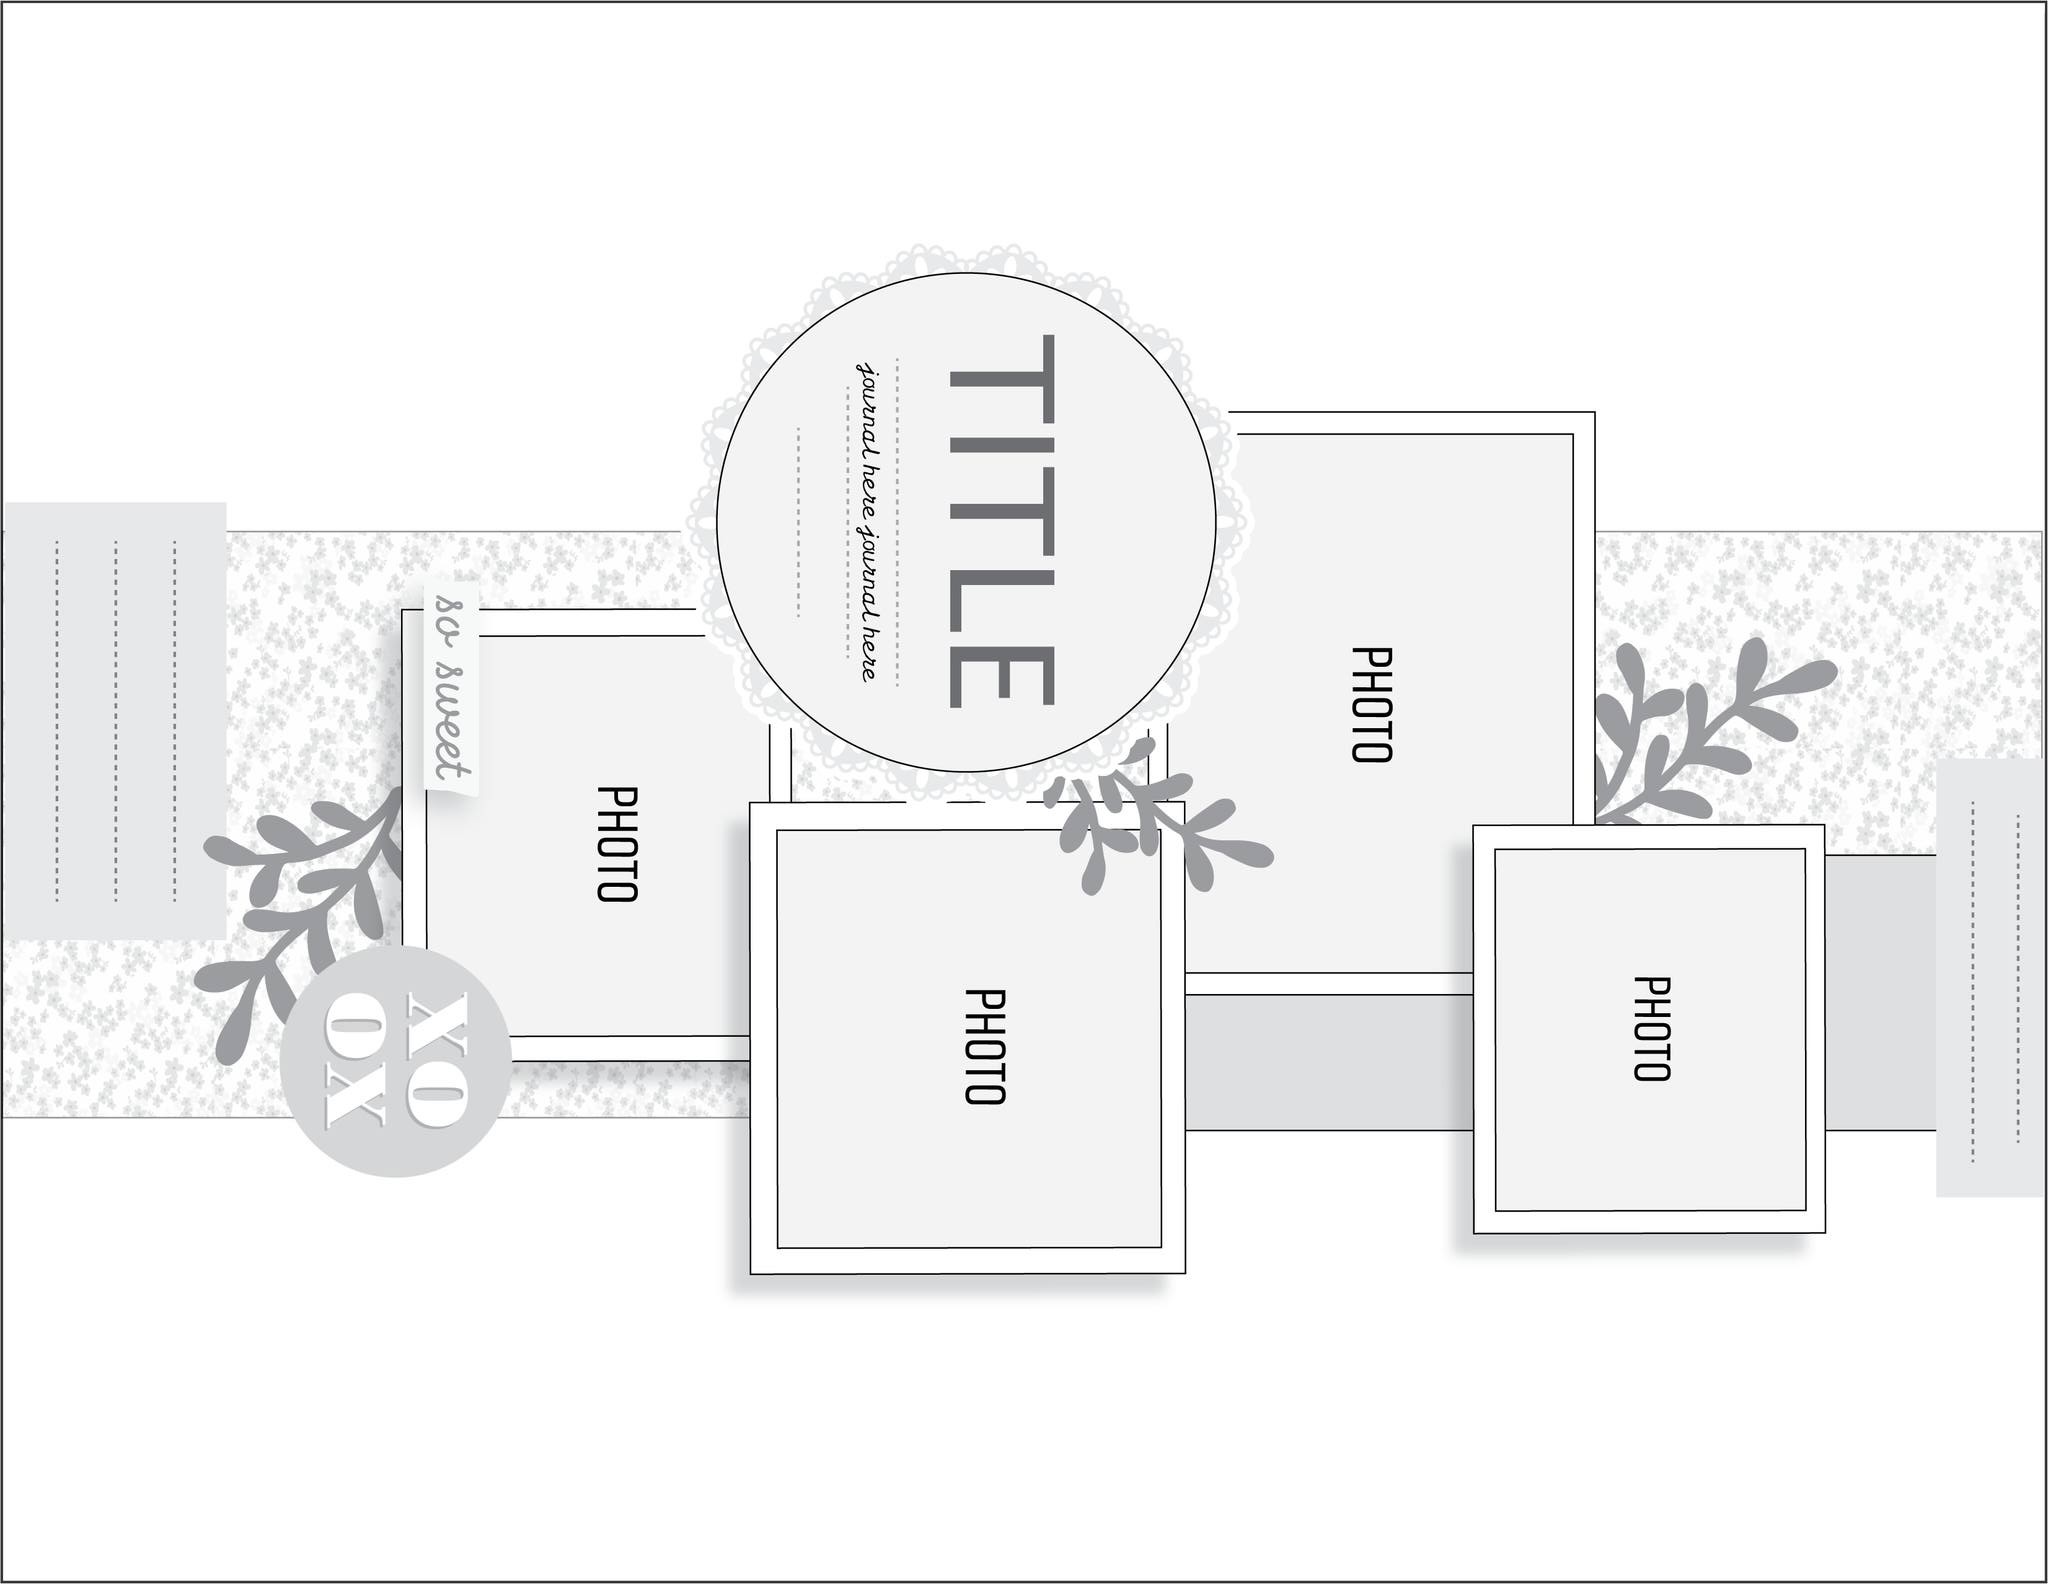
Hello Friends! It is Marci here. I am so excited to post my first Sunday Sketch Challenge for Citrus Twist Kits! Here is the sketch we are working with today. 


Sketches can be followed exactly as they are drawn or they can be used just as motivation to get you started. One great thing about sketches is that they can be turned in any direction which can give the viewer a completely different design. That is what I did today with this sketch. I turned it 90 degrees. By making the sketch horizontal rather then vertical, I now have a sketch with the same proportions as a life crafted, out of the page protector layout. 


Here is my final layout. 

I started with two pieces of textured, white card stock, cut to 5in wide by 8.25in tall. I knew I wanted to document a recent walk on the beach I took with my dog. It was a gorgeous day and the pictures came out with beautiful blue colors. The peach card stock dollie in the cherish ephemera pack paired beautifully with the blues in my photos. I started with this element first by placing it at the top of the left page, similar to the circle element in the sketch. Next, I wanted my largest photo to take center stage so I placed it also on the left side under the the area that would house the title. 


That left my three smaller photos. I placed them on the right side is a zig-zag pattern similar to the sketch’s placement. 


Another key element in the sketch is a wide piece of pattern paper that goes top to bottom in the original image or side to side in the rotated sketch. I started off using the dark blue cherish digital journal card and printing it as a long strip of paper. I like the dark blue paper with my water photos. I needed another paper to add interest to my page but not distract from the photos. I decided to use a light grey ink and stamp my own patterned paper. There is an elongated hexagon on the Cherish Stamp Set that reminded me of cobblestones. I thought that would work perfect. 


After placing all the large elements on my page I filled in some of the blank spaces with the blue and peach flowers from the ephemera pack as well as some hearts and dots from the Cherish puffy word, phrase and numbers snippet sheet.. Lastly, the sketch had dotted lines drawn at the top and bottom of the sketch. They made me think of stitch lines so I added some white stitching to some embellishments on each page. I think it give the layout some added interest and texture. 


Thank you for stopping by. I hope you find this sketch as fun as I did.  Have a great Sunday being creative!