Pages

Tuesday, February 27, 2018

Tuesday Tutorial With Mary - Hanging Pennant


Hi friends!  It's Mary and I am back with a tutorial on how to make this super cute hanging pennant for your next project!  It's pretty picture heavy but really simple to make.  The whole layout only took me an hour to do!


First you'll need to pick out a patterned paper that's double sided!  I chose the Crate Paper,
Good Vibes, "Hashtag" paper because it had the fun pops of color on one side and a subtle pattern on the other.  OR!  You the book pages Trina has been including in the kits would look adorable too!  Then grab a wood skewer out of your kitchen drawer.  Any small twig would do if you don't have a kitchen skewer.  Also, you'll need a marker long enough to use as a guide to bend your scroll at the top.  I included the twine from the February kit as well as one little charm to use as my hanger.


Next, you'll want to cut down your pennant.  I am using a 3x3 square photo so I made mine about and inch wider .  You'll want about an inch and a half for the tail and then about 2" for the roll at the top.  This does not have to be an exact measurement, just eyeball it to your liking.  However I'll give you measurements based of mine and you can take it from there.  My end piece was about 4" x 7".


Then we'll want to make our tail.  Just measure up 1.5" and make a little mark on each side.


Then find your center point by pinching the two ends together and gently creasing the middle. 


 Then cut from your 1.5" mark down to the center on both sides and you'll have yourself a point. 


Okay!  Now we're getting somewhere!  Take your marker and roll the top over the edge, gently forcing the roll into submission hahah. 


Then glue along the edge, curve the bottom side down and hold until dry.  I use my fineline bottle with scotch quick dry adhesive for better precision and a quick adhesion.  


Once your scroll has dried, it's time to make the wood dowel to fit through the hole.  Again, I just eyeballed what would look pleasing to my eye but I cut the skewer down to about 5", just about a half inch sticking out on both sides. 


I glued the wood to the back of the scroll so that when it sat on my page, the dowel would look a little elevated and more realistic.  


Lastly I wrapped the thread around the dowel on each side, tacking it with a small amount of glue to hold it in place.  If you use a charm like I did, don't forget to string it on now before wrapping and glueing the other side down.  Trust me, I learned that the hard way. lol!


See?  Easy right?  Now use this as a layering piece behind you photo, a journaling spot, or even a statement title!  Here are some close ups of the final layout for you:


And another look at the final layout:


I hope you'll try this trend on one of your projects and thanks so much for hanging out with me today!

Xo,
Mary

Monday, February 26, 2018

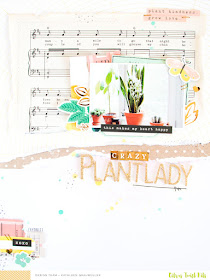
"Crazy Plantlady" Layout & How to Use Vintage Music Book Pages with Kathleen

Hey there, it's Kathleen here again and today I want to show you how you can incorporate the vintage music book sheets that were included in the February "Cedar Grove" scrapbooking kit.

For my layout I used the music book sheet as a layering piece for my background. Behind that I used the CTK exclusive paper with the very subtle yellow geometric pattern. The music sheet was perfect to add some more texture and pattern to my page without overloading it, since the colour of the music sheet is quite neutral.

Crazy Plantlady by ScatteredConfetti. // #citrustwistkits #scrapbooking #cratepaper

Crazy Plantlady by ScatteredConfetti. // #citrustwistkits #scrapbooking #cratepaper

Because the colours in my photo were very vibrant already, I didn't want to add too much colour anymore. I pulled the green and red/terracotta from the photo and added some more yellow bits and pieces to repeat the yellow from the patterned paper in my background.

I didn't add any journaling on this page because it doesn't really need it. This is just a photo of some (of the many) plants in our home, taken while my sansevieria plant was in bloom :)

Crazy Plantlady by ScatteredConfetti. // #citrustwistkits #scrapbooking #cratepaper

To fill the white space on the lower half of my page, I added another little cluster of labels, ticket stubs (that I cut from the Crate Paper Flourish "Always" paper) and one of the Pinkfresh Studio "Let Your Heart Decide" leatherette stickers.

Crazy Plantlady by ScatteredConfetti. // #citrustwistkits #scrapbooking #cratepaper

I used the exclusive stamp set and some spray mists to finish off my page and that's it :)

Hope you like this layout and feel inspired to use the vintage music book sheets from your kits! Or maybe you already have? Let me know how you used yours!

Thanks for stopping by,
Kathleen

Sunday, February 25, 2018

Sunday Sketch with Chantal

This week, our layout sketch is a 12x12 layout with pretty patterns, pops of colour and loads of layers. Fellow creative team member Anna Uhras, is joining me this week and sharing her take on our scrapbook sketch.


For my project, I converted the original sketch to a 8.5 x 11 and stuck to a fairly neutral colour palette using five different patterned papers & the vintage music book page, from the Main Scrapbook kit.

I first used the word "loving" from the Main Scrapbook kit stamp set, to make a pattern at the bottom of my page and once everything was dry, I proceeded to glue on all of my layers including my photo.

For some colour, I choose a Maggie Holmes navy ephemera bit, added some text and used the exclusive stamp set to stamp a grey circle onto the polka dotted piece. I then glued on a gold sticker from the Flourish sticker set, finished it off with a Thicker and glued it onto my page. 

The title and flag (at the top of my page) were created in Photoshop and cut with my Silhouette Cameo. Next, I added a little paint splatter and some buttons and the flag + title pieces were finally sewed down to my project. As a last minute add on, one of the heart paper clips was slipped onto the ephemera piece as well...it was too cute not to include!


Sketches are a Godsend when you have no idea what to do and they are an excellent starting point for any project (layout, project life spread, mini album or card). Creating a sketch in Photoshop has always been my starting point, when putting together a layout. It saves me heaps of time!


And here is Anna's take on our Scrapbook sketch;


I'm so happy to pair up with the super talented and lovely Chantal today, with this edition of CTK Sunday Sketch. My interpretation is pretty close to the original design though, with a little twist.

I've used the Main Scrapbook kit, Embellishment kit and The February Pattern Paper Play to create this page. I'm totally IN LOVE with the Maggie Holmes Flourish Poppy patterned paper! Just saying...


Now it's your turn! To play along with this weeks sketch and be eligible to win a $5 gift certificate to the Citrus Twist Kits store, create a project inspired by this week's sketch and upload it to the CTK gallery with today's date (02/25) in the title.

Happy creating!!!

3 to inspire with Célina


Hello Girls,

How are you ! 

Is your pocket life 2018 going well ?

For me, this year, it's.a pleasure to do it, with the photos of my baby !

But today, I came to show you 2 pages made with the PL February Kit. 

I fell in love with the Crate Paper papers and I wanted to inspire you with two layouts flowery !! 

Maggie Holmes Flowers are always my favorite !

Some of pictures of the kits with all these CTK exclus !


For this new 3 to inspire, I propose you to :

1/ Insert flowers into your page
2/ Sew some of your elements to bring texture
3/ Cut large letters in paper to make your title

Here are my pages :


See you girls ! Have a beautiful week-end !

xoxo

Célina


Friday, February 23, 2018

PL Challenge with Kristel

Hi all! Today I have yet a new PL challenge for you :-)
I have been using this month's PL kit "Cedar Grove" for this page, but of course you can use any previous kit for this challenge as well. 


The first thing that challenged me with this page was a specific color... Red.
I love red, as you can see our dining chairs are even red, but for some reason I find it
a difficult color to work with.
So, for this page, I challenged myself to use red! :-)


I also always love to use word stickers or labels and since we get enough of these in the CTK kits,
I thought I would use as many as I could on one page!


I started by creating this 3x4 filler card as I thought those colored stripes were perfect to use
as a background for matching colored word labels - except for those black ones.


I also love to use these labels onto my photos. I normally don't really embellish my photos, but
a lovely word or phrase is always fun!


So, to sum it up for this week's PL challenge:
- Try to challenge yourself by using a color you like, but think is difficult
- Use as many word labels as you can! :-)

I hope you will have a lot of fun challenging yourself and that you'll discover lots of 
new ways to make your pages pretty!

Have a lovely weekend and until next time!

Love, Kristel

Thursday, February 22, 2018

First Day with Emma

Hi CTK friends!  Emma on the blog today to share a layout using the, oh so gorgeous, February Main kit!  I'm quite sure I've confessed my love of circles before - there is just something about them that I adore and I find myself sneaking them onto pages without even realising sometimes.  In this case it was actually a conscious decision but rather just use circles on my page, I mixed it up by adding them onto 2x2 squares and creating my own patterned background!

This is one of those layouts that kind of just came together on its own.  I started it with an idea of using circles and the design changed a few times in the process of actually putting it together ;)

Here's a look at the page I created:


As you know (or may not know), my pages are all 6x8 which means I'm always left with lots of 6x4 "scraps" of paper, particularly white cardstock which I almost always use for my backgrounds and I'm forever looking for ways to use them up.  For this page I've used them by cutting little 2x2 squares and then adhered my circles on top (I used my glue pen).  I used a 3/4" punch and cut dozens of them using almost all of the papers included in the Main kit.

 I think I had around 10 of the 2x2 squares done by the time I'd used up all my punched circles (I went a little crazy with my trusty little punch).  I had originally planned to just adhere them to the page in a plain square pattern but by some odd chance, I'd turned one on the diagonal and liked how it looked so ran with that instead.

 
Rather than keep it all square and uniformed I cut a few of them in half (so they're 1x2") and mixed the positioning, keeping a small border around them.  Although I've mixed all the patterns with the circles I found that having the squares/rectangles all butt up together was crazy busy so that small white border around each shape helped to break things up a bit.

I adhered the pieces using double-sided tape but I've also gone over a few pieces with the sewing machine (using either standard straight stitch or the zig-zag).  My pages are not complete without some machine stitching on them!


My journaling is typed up in Photoshop and I just make sure it fit within the 2x2 white squares then printed it on the same white cardstock I've used on the background (using up more of that scrap cardstock I have!).


The gold alphas included in the main kit are gorgeous and I LOVE how they have mixed sizes of the font.  I often have trouble using some of the alphas on my page becuase they are so big but these smaller fonts are perfect.  I used a combination of the small and large fonts here and by some small miracle, they are a perfect fit for my 2x2 square format!


Although I knew what my layout was going to be about I actually left the photo printing until I'd figured out the background design.  Although my title/journaling are on the angle I didn't want my photo to be so I used Photoshop to create the diamond shaped template for my photo and then just printed it on 6x4 photo paper.

I left the embellishing to the bare minimum because the page has alot going on in the background already, I just tucked one of the word stickers at the bottom of my journaling then cut the yellow heart from the leatherette stickers and popped it underneath.  And that's it!  Embellishing is my favourite process of any layout so only having 2 pieces is unheard of for me ;)


I'm not going to lie - this page took a bit of time to put together.  I'm a slow scrapper at the bet of times but this probably took a few hours (I want to say 2 hours but in all honesty I think it was probably longer than that, ha!). It was fiddly, and somewhat messy with gluing all those circles down, but I thoroughly enjoyed every second of it!  And it's such a great way to use all those patterned papers too (without it looking like a crazy mash of patterns!).


I am so happy how this page finished up.  I got to use my favourite shape (circle) but added a new spin on it by having them stuck to 2x2 squares and having them on an angle. 

Thanks so much for joining me on the blog today!  I hope this might inspire you to try a new spin on a trusted favourite shape/technique of yours!  Take care, Em xo